In this article, we’ll show you how to make a portfolio website using WordPress for 2018 and 2019. The internet provides you with the ability to reach anyone in the world to showcase your credentials (like a CV or resume) or examples of your work. This can be an extremely powerful tool to help you further your career, grow a following, or connect with your target audience.
The primary goals of your portfolio website should be to appear professional, be relevant to your niche or line of work, and, of course, promote your skills and display your work. To help you do this, we’ll use WordPress as well as one of the top-rated WordPress themes, Ultra by Themify. The blog we’ll help you build is 100% mobile responsive, SEO friendly, and features an intuitive and beginner-friendly drag and drop page builder that will allow you to customize your site to suit your style.
VIEW THEMEBLUEHOST DISCOUNTLIVE DEMO
Here’s what we’ll cover:
- Before making a portfolio website
- Tips for making a successful portfolio website
- How much does it cost to make a portfolio website
- How to make a portfolio website (5 simple steps)
- Next steps
Before making a portfolio website
Before getting started, it’s important to take a moment to define your target audience, identify your goals, and consider the things that will make your portfolio website uniquely you, and entice users to engage.
Defining what you want to achieve with your portfolio is the first step to creating a portfolio website. This goal should underpin all the subsequent steps. So, start by making sure you have the final answer to the question of whether you want this site to act as a resume, showcase of your work, or something different. Then, follow these next tips:
Tips for making a successful portfolio website
How to choose a name for your portfolio website
Choosing the right name for your site isn’t a decision you should take lightly as it will ultimately reveal your identity or become your brand. However, it isn’t something that should feel labored either. Here are four things to consider:
Is it unique, memorable, and You? Your blog name should be unique, memorable, and most importantly, it should be representative of you. It will be your primary identifier (at least initially) and as such should feel natural or organic. Also, depending on whether you are creating a portfolio website for yourself or a business/agency, it might be best to just use your own name or agency name. If it’s taken, think of creative ways in which you can use it in abbreviations or add something short and unique to it.
Choose something you can scale and grow with. Does the name of your portfolio website have room to grow with you? Once again, this will strongly hinge on whether you are promoting yourself as an individual professional or as a business/agency. If you want to promote your services to a wide audience, don’t choose something too niche-specific so that you don’t run the risk of limiting your audience.
Keep it as short as possible. A short name and domain is often easier to say, share, and will generally perform better in Google’s Search Engine Results Pages (SERPs), which will become more important as you try to expand your presence.
Make sure the domain name is available. Try to choose a name where the .com version of the domain is available as well as the social media handles. A .com domain is the most globally recognized and should be your number one option. Alternatively, try and secure either a niche specific top-level domain or one of the more commonly known domain extensions.
* To check domain availability, follow the link below, hover over ‘Hosting’ in the main menu and select ‘Domain’. Enter the domain name and choose the free domain extension you want. If your domain name is available you will be taken to a page to review and purchase it. Alternatively, if it’s not available you’ll be shown other options or you will need to try something else.
Why make a portfolio website?
Learning how to make a portfolio is a valuable skill and may just be one of the smartest investments you make in your future in this digital age we live in. By the end of this article, you will be equipped with the tools to share your skills, examples of your work, and present yourself professionally online!
There are a number of reasons for making a portfolio website, for example, you may want to:
Attract future employers.
At first, it might not seem likely for an employer to search for potential job candidates online. However, if you work in a very niche-specific field and generate enough traffic, chances are good that others in the industry will come across your website, even potential employers. Secondly, it’s impressive and appears highly professional having an online portfolio or resume.
Draw more attention to your works.
This point is especially valid for anyone working in the arts or any other type of creative work. Portfolio websites have become a popular platform for everyone from videographers to photographers to sculptors to musicians to showcase their work online. This can easily extend to other fields like construction, carpentry, etc.
Become an industry authority.
You could leverage your online portfolio alongside something like a blog or podcast to establish yourself as an industry expert (authority). Not only will this help your professional image but will also lead to an increase in visitors to your site, linkbacks, etc. that will help spread your presence online.
Sell your services online.
If you offer products or services, an online portfolio can help build trust in your brand and attract potential customers or clients. One example where this type of portfolio site has been especially successful for their owners is when it comes to photographers who offer their services for weddings, maternity shoots, etc.
Promote your business or personal brand.
Do you have an existing business, in the process of starting a new one, or want to develop your personal brand? An online portfolio can be a great vehicle for connecting with potential clients and creating opportunities. A portfolio can also be used to demonstrate your expertise and authority within an industry.
As a fantastic bonus, it shows that you are highly savvy when it comes to the web which is a highly sellable attribute in any field.
Attributes of a successful portfolio website
For the purpose of this article, we’ve defined a successful portfolio website to be one that ticks all of these boxes – Present you or your brand in a professional way, attract the attention of potential employers/partners, showcase your work or skills in a way that attracts potential customers or clients.
- Profesional & minimalist look: A great design doesn’t necessarily mean
it has to be intricate or complicated. In fact, you don’t want the site to distract from its true purpose which is to present yourself, your services, your brand, or your products in an attractive way. That’s why some of the best portfolio sites tend toward a minimalist design as it’s easy to make your website clean, professional, organized, and to highlight the content. - Great design & user experience: If you’ve ever gone for a work interview before, you know how important first impressions are. Do you think your peers or future employer would be impressed if they visit your site and it looks subpar or the design breaks? Although it might not be your forte, putting some extra time and effort into the design will lead to a huge payoff in how you are perceived. By following the steps in this tutorial, you will see how easy to is to create a great design using WordPress and the Ultra theme.
- A coherent message or goal: Remember those goals we talked about? While designing your site and thinking about your content, always stay mindful of what you want to achieve and what you want others to take away from your website. You will use different language based on whether you are promoting yourself, your brand, your products, etc. Similarly, it will affect what content and elements you utilize, such as bios, galleries, etc.
- Findable and SEO-optimized: While you don’t have to go to the great lengths of those who want to make a living off of blogging or becoming an internet authority, it pays to do some SEO research and optimization. This will drastically increase the chance of anyone (especially those who you want to) of finding your portfolio website and being exposed to your awesomeness.
How much does it cost to make a portfolio website
For most people, the biggest cost of starting a portfolio website is time or sweat-equity. As this site is all about you and your work, you should have ownership of most of the content you use and have less reliance on outside sources.
In terms of the monetary costs, you’ll need a budget of about $100 – 250 to create a professional looking portfolio website.
You should allow the following budget when getting started:
- Domain + hosting: $3 – 10 per month (depending on hosting term – discount hosting available)
- Premium WordPress theme: $50 – 100 (view: Best Business Website WordPress Themes)
- Branding and photography assets: variable
For this portfolio website tutorial, we’ll use the Ultra WordPress theme and provide access to discount hosting through Bluehost.
ULTRA EXAMPLESBLUEHOST DISCOUNT
How to make a portfolio website (5 simple steps)
Step 1: Preparation & planning
One of the biggest mistakes beginners make when making a portfolio website is that they forget to begin with the end in mind. Thinking about what you want to ultimately achieve with your site will make the process a whole lot smoother and produce a better result.
Before we start installing WordPress and creating your posts and pages it’s important to take a moment to define your target audience, identify your niche, and consider the things that will make your site uniquely you, and entice users to engage.
What is the goal of your portfolio website?
- To attract potential employers
- To grow your social media following
- To showcase examples of your previous projects
- Or, perhaps something entirely different
What you will need to start your portfolio website
Once you’ve outlined the pages you want to include on your website and put together the rough layout for each page, you’ll then need to start writing the copy, sourcing or designing the images and graphics, and planning the navigational elements.
Go through each page layout, write the content for each section and decide on the media elements you want to use.
Sourcing great images for your website will an important aspect, to assist with this check out our Best royalty free stock photo sites article. Here you will find a list of free high-quality photo sites where you can download images that you can use on your website for free.
From a branding perspective, you will need:
- A logo,
- A Favicon (which is the icon that appears in the browser tab when a user visits your website),
- And your brand color palette, including the hexadecimal color codes. We’ll show you how to customize your website with these colors later in this tutorial.
There are a number of great tools like paletton.com, Adobe color, or color-hex.com that can be useful.
If you need help with copywriting or graphic design, consider using a third-party platform like:
Intro to website and user experience (UX) design
User experience design is the process of optimizing the layout for your website and ultimately how users will engage with your website to help achieve your objectives.
The portfolio architecture for your site will consist of the following:
- Static pages – these are pages such as your about page, contact page, or privacy policy.
- Portfolio Posts – these will be the individual posts (in this case, portfolios) that will make up the bulk of your site’s content.
- Category or archive pages – which is how you organize your individual portfolio posts. Each portfolio will be grouped or assigned to a category or multiple categories.
The other components of your website will include a sidebar (if you decide to include one), a global footer, and your menu or navigation.
For this tutorial, we’ll use the Ultra theme by Themify. This is a premium WordPress theme and features a number of layouts for you to choose from that have all been optimized from a UX perspective. You can view the various layouts below.
Outline the pages, posts, and categories you want to include on your site. It’s often a good idea to draw this out, so you can visualize what you’re about to create.
Before you start digging into creating portfolio posts, you may want to start by gathering and organizing your skills or previous projects (depending on the purpose of your site). Also, collect all the relevant information for each entry in your resume or project and arrange it in a way that makes sense. This will make the process of creating the categories and portfolios much smoother.
Ok, so there’s a lot to consider. Hopefully, you’re still with us and you can see the value in why it’s a good idea to think about all those things before jumping into making your portfolio website.
Step 2: Register your domain, set up hosting, & install WordPress
If you haven’t already, the first step is to register your domain, set up your website hosting account, and install WordPress for your blog. So we’re all on the same page, let us quickly explain what they are.
Your domain, or URL – is the web address for your website, and is what users will type into their browsers to access your site. For OHKLYN it’s OHKLYN.com. Pick something that works for you.
Hosting, is what allows your website to be accessible to users 24/7. It’s the process of storing the content and data for your website on a web server and serving it to users.
For this tutorial, we’ll walk you through getting started with Bluehost, as we believe it’s the best option for beginners.
Ok, so let’s go through the steps for setting up hosting for your website and registering your free domain.
Steps to register your domain & set up hosting:
- Head to the bluehost website (massive hosting discount up to 54% + FREE domain). The free Bluehost domain extensions included are (.com, .online, .site, .website, .space, .tech, .store, .net, .org, .info, .co, .us, .biz, .club).Note: If you want a specific top level domain (TLD) or country specific domain not listed above, you will need to purchase it through a domain registrar like GoDaddy or CrazyDomains. You will also need to change the domain nameservers or (DNS) records to point at Bluehost’s servers. Here are the steps on how to change domain nameservers to point at bluehost.
- Select ‘get started now’ for the plan you want (shared hosting will be fine for most users & you can always upgrade later).
- Choose the hosting plan that’s right for you, hit ‘select’.
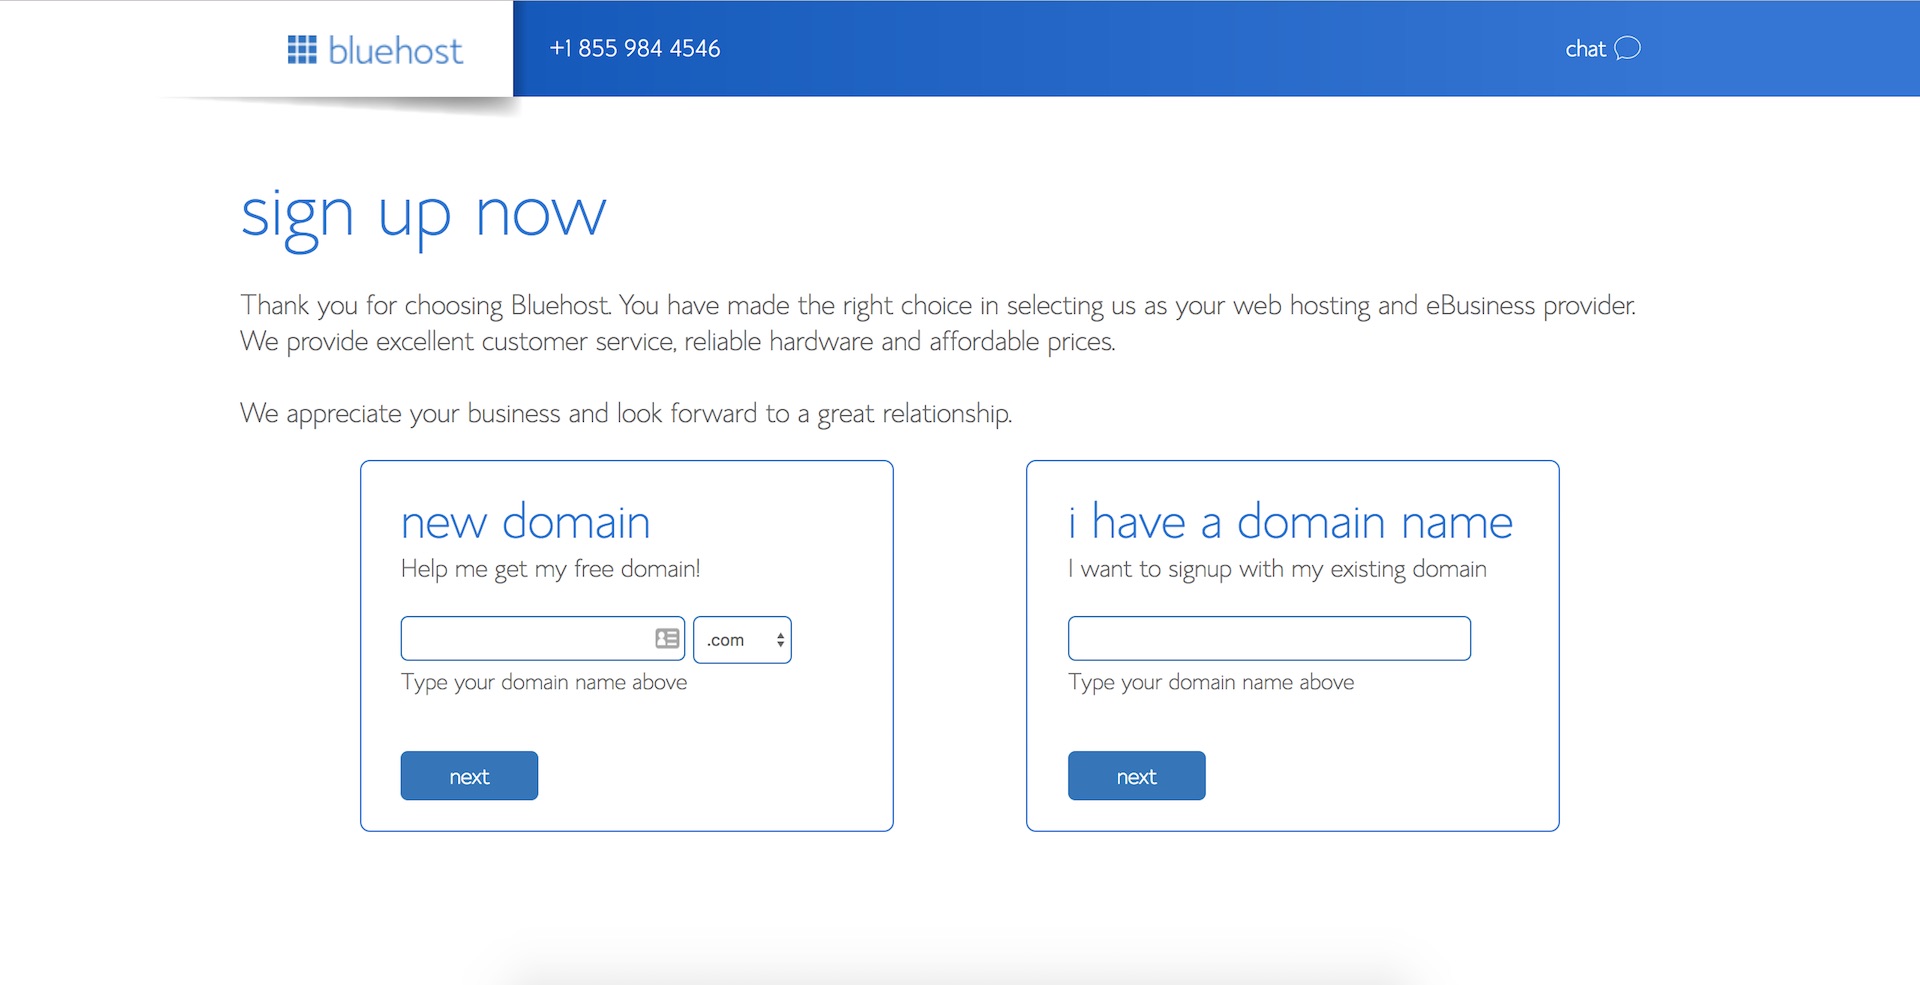
- Either use your existing domain, or type in the domain that you want (it’s free), then hit ‘next’.
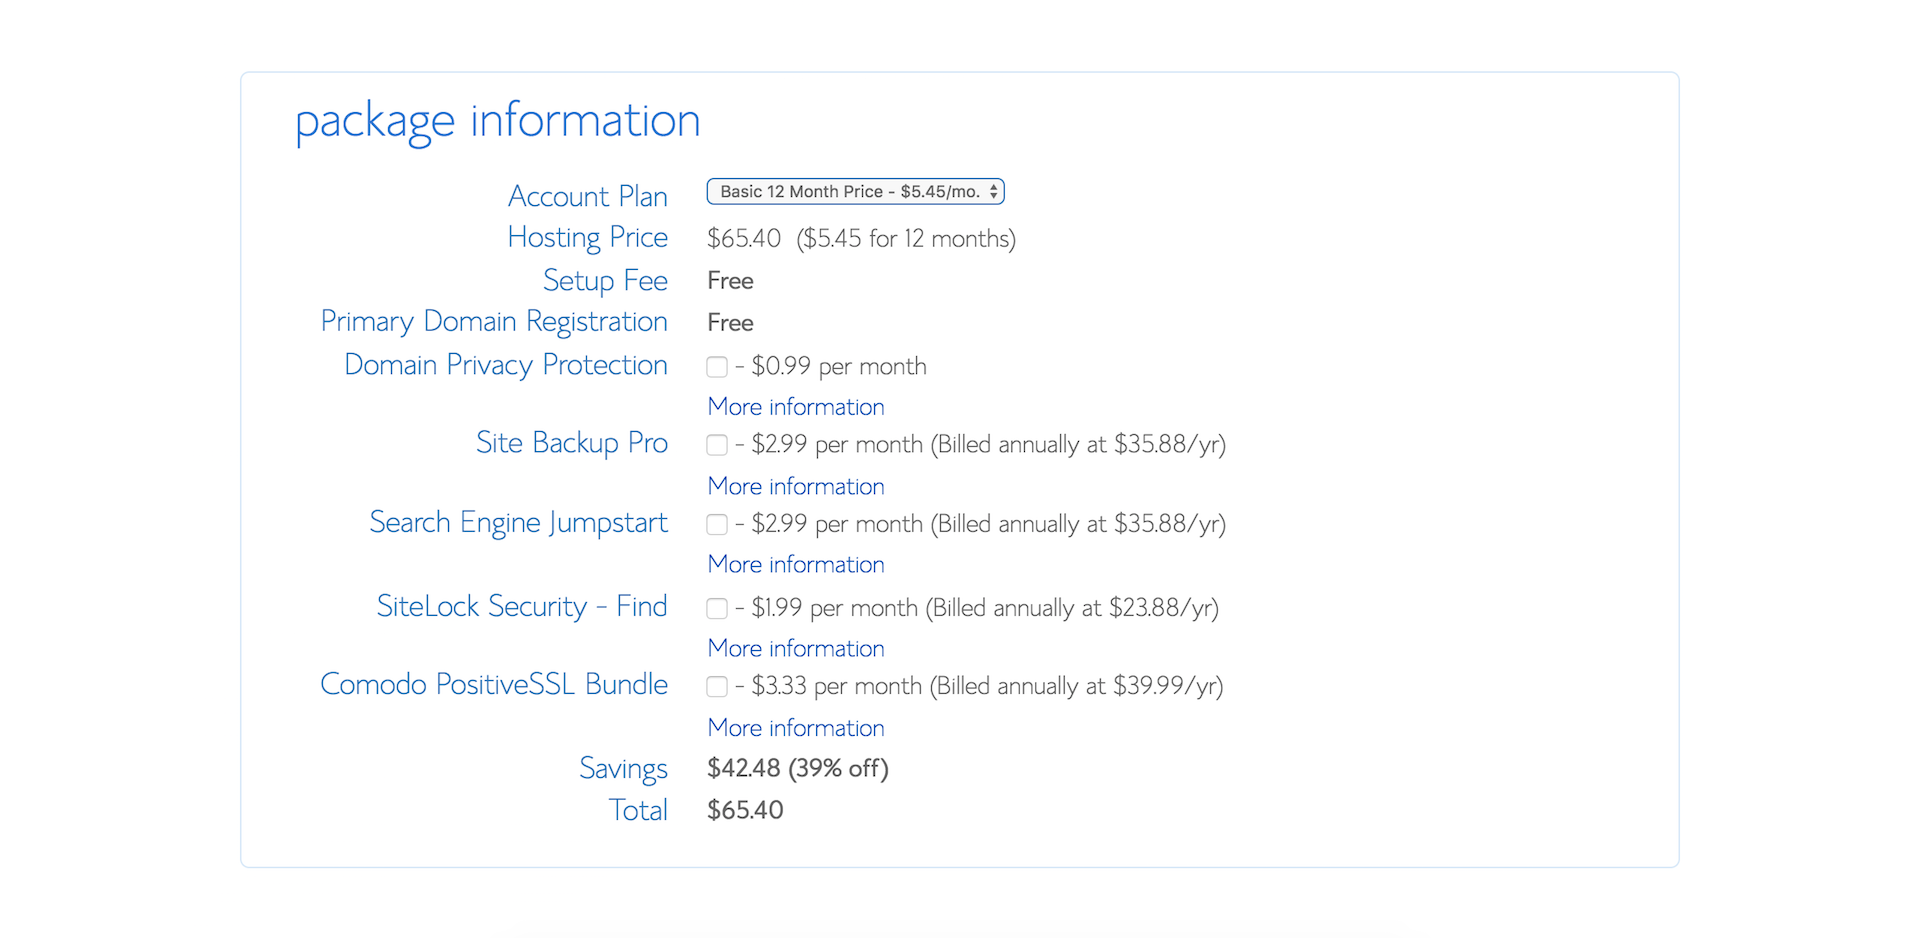
- Choose your desired hosting term and domain add-on preferences. We recommend selecting ‘domain privacy protection’ so that the personal information associated with your domain, isn’t publicly available (optional).
- Once you’ve chosen your desired options, enter your personal information, payment details, review the terms of use, and click ‘submit’ to move on to the installing WordPress.
Steps to install WordPress:
One of the reasons we love Bluehost is their easy to use One-click WordPress installation feature. In September 2017, Bluehost made the process of getting started with WordPress even easier. For new domains, WordPress is automatically installed for you so you can start building your site right away.
- When you see the ‘Congratulations’ message, click on login.
- You will be sent a verification email to the nominated email address for the account, which you will need to confirm.
- You can then set your password for your hosting account.
- Once you’ve done that, you will then be given the option to either ‘Start Building’, which will take you to the backend of your WordPress dashboard, or you can select to go to your Bluehost account.
Install WordPress for an existing domain via Bluehost
If you’ve purchased your domain elsewhere, you will need to change the DNS records for your domain via the domain registrar where you purchased your domain. Check out one of our detailed tutorials that walk you through this process:
- How to change GoDaddy nameservers to point at Bluehost
- How to change Domain Name Server (DNS) records to point at Bluehost
Congratulations! You’ve officially started your blog! It’s not much at the moment, but you’re a lot closer than you realize.
As part of this process, we’ll provide a link to our article on how to set up your free SSL certificate which will encrypt the data on your blog. This is best practice as it improves the security on your blog, allows you to take payments on your site, and will improve your Google rankings.
If you’re new to WordPress, we’d recommend reviewing our How to use WordPress article which is a free introduction to WordPress tutorial for beginners.
Ok, we’ve covered preparation, as well as registering your domain, setting up hosting, and installing WordPress. We can now move on to the step number three.
Step 3: WordPress fundamentals for beginners
Whenever you want to log into the backend of your WordPress blog, enter your domain and add /wp-admin to the end (i.e example.com/wp-admin). Then enter your username and password that you set up in the prior step. You’ll then be taken to your WordPress dashboard.
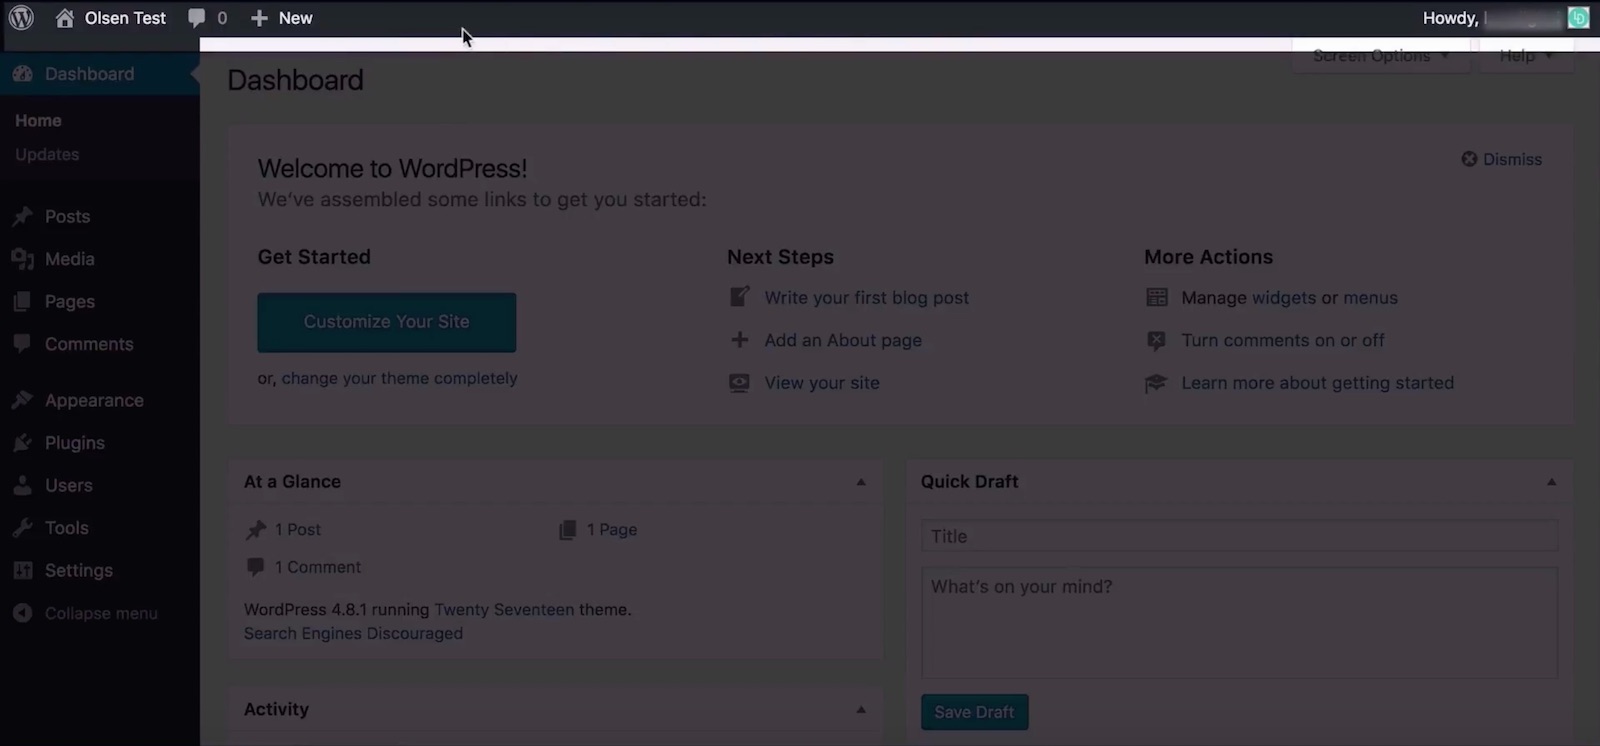
The WordPress dashboard or admin panel is broken down into 3 main sections: at the top, we have the WordPress toolbar, the menu or admin menu is located on the left-hand side, and the main admin area is in the middle, where we’ll do most of our work.
We’ll give you a brief overview of each section now – however, for a more detailed overview, watch our free how to use WordPress tutorial, which is an introduction to WordPress for Beginners. This is intended to get you up to speed on the fundamentals of how WordPress works in about an hour.
WordPress toolbar
The WordPress toolbar at the top is dynamic and adjusts the available options depending on which page you’re on, and if you’re viewing the page from the front or backend.
WordPress admin menu
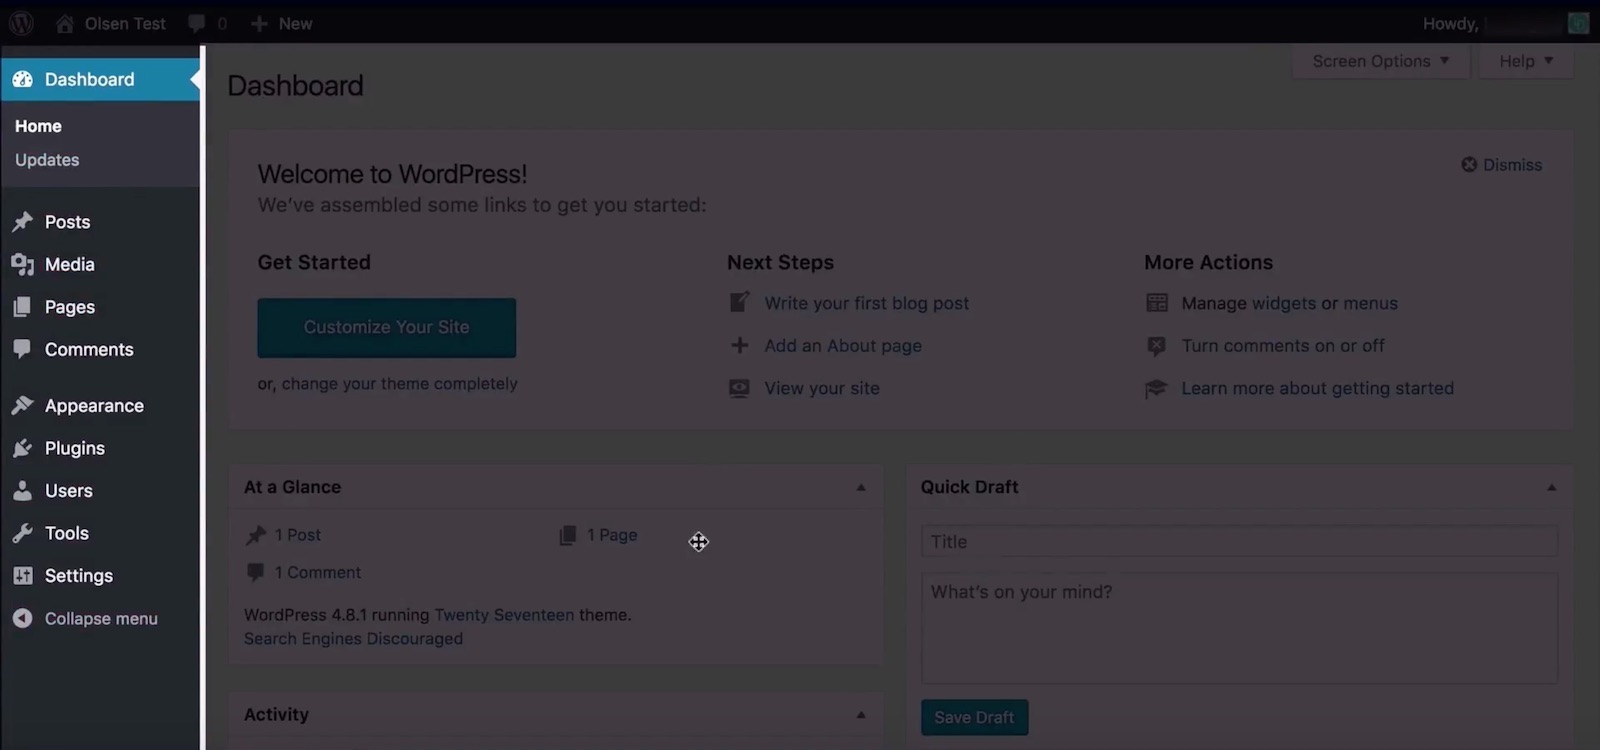
The Admin menu located to the left of your dashboard is separated into 3 main sections, these are: The Dashboard section, the Content Management section, and the Site Administration section.
- The Dashboard section provides easy access to the Dashboard, updates, and additional plugin features.
- The Content Management section is where you create and manage Posts, Pages, Media items, Comments and additional plugin features.
- The Site Administration section is where you configure the design and appearance settings for your website (including selecting the active theme for your website, creating and managing menus, widgets, and customizing your website’s theme). It’s also where we manage plugins, users, control global WordPress settings, and activated theme and plugin extensions like SEO, Social sharing, theme specific settings, and security.
WordPress admin panel
Lastly, the main Admin area serves as our primary workspace, and adjusts depending on what’s selected from the admin menu.
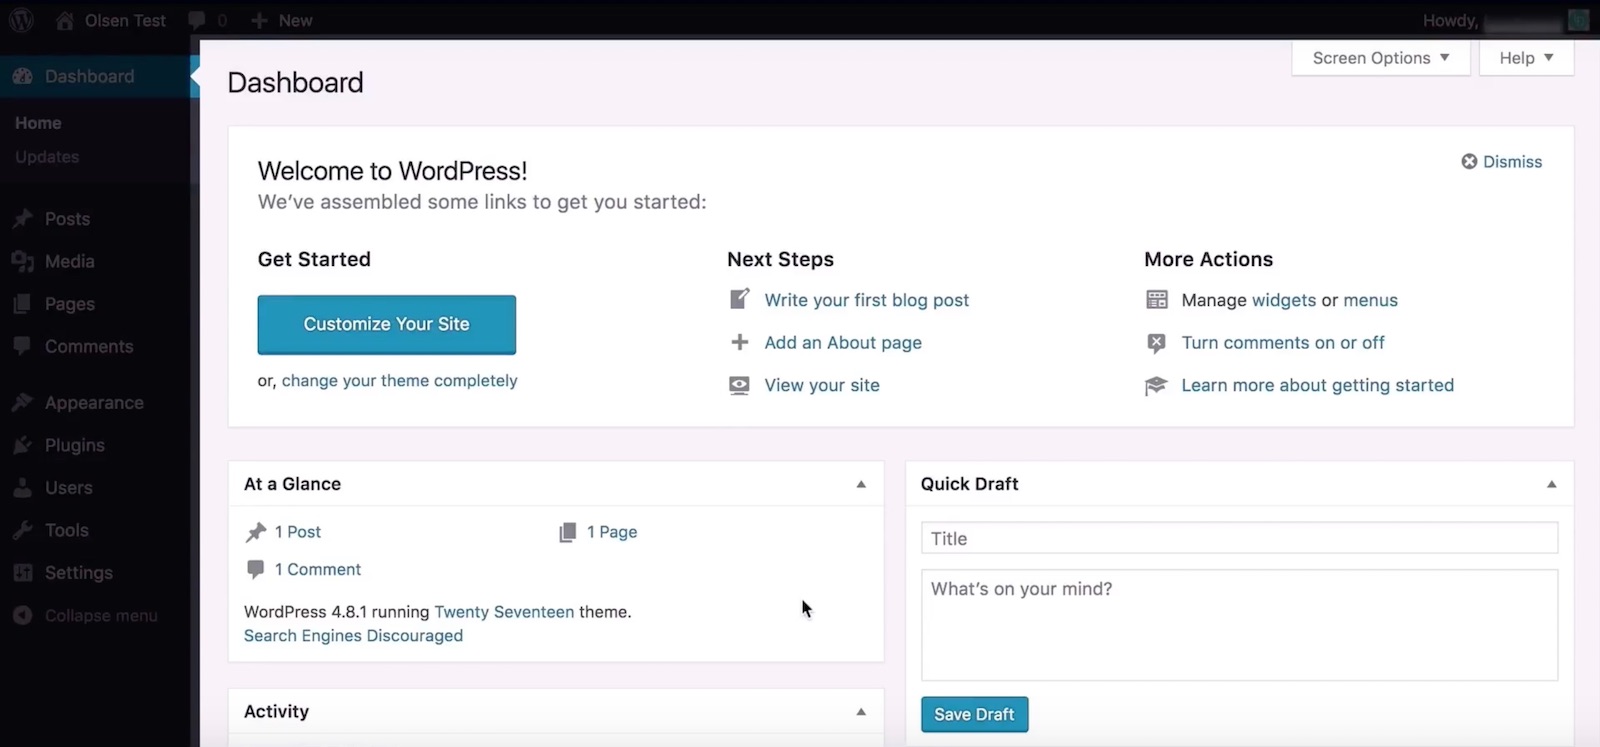
We’ll go through some practical examples for each of these in the coming sections once we upload our theme and start working with content.
Permalink settings
One thing we recommend doing before we move on is updating the permalink structure for your website. This will impact how your URL strings will be created for pages, posts, etc.
To do this:
- Hover over ‘settings’ in the admin menu, then select ‘permalinks’.
- The default option, leverages a more journal approach featuring the date in the permalink. However, the more common option and what we’d recommend from an SEO and UX perspective is post name. So we’ll select that option.
- Then save changes.
Managing users on your blog
If you want to update your user profile or add users to your blog, you can do this by hovering over ‘users’ in the admin menu on the left, and selecting from the options there.
Once again, for a detailed walkthrough of WordPress, we recommend watching our how to use WordPress tutorial.
Step 4 | How to upload and install your WordPress theme
A WordPress theme is a group of files that work with the underlying WordPress software to enhance the design and functionality of your WordPress website. For a more detailed overview, check out our What is a WordPress theme article.
For this tutorial, we’ll use our top-rated business website theme – Ultra by Themify. For 30% OFF, subscribe to the OHKLYN blog and you’ll be sent a welcome email with an exclusive discount code.
Create a Themify account
- Navigate to the Themify website
- You can either purchase just the Ultra theme (with or without the photoshop files)
- Or under pricing, you can select one of their club memberships, which gives you access to all of their themes
- Depending on which option you choose, you’ll get various inclusions for the year, or you can select their lifetime club, which gives you access to everything for life
- We have their lifetime club as we use a number of their themes, but pick what’s right for you
- Enter in your information
- If you’ve subscribed to the OHKLYN blog, add the discount code you received in the welcome email, and select ‘next’
- Add your payment information
- Then log into your Themify dashboard
Download the Ultra WordPress theme
- From your Themify dashboard, scroll down to the themes section
- Click on the Ultra theme link to download the theme file (which will be a .zip file)
- You will upload the theme file as is, so there’s no need to unzip the file.
Next, we’ll upload the Ultra WordPress theme. If you want to install a child theme you can either use our free child theme generator. Alternatively, you could also use a plugin called Child Theme Configurator to help set this up. This is best practice but not essential.
Upload and install the Ultra WordPress theme
- From your WordPress dashboard, hover over appearance in the admin menu on the left, and select ‘themes’
- From here, select ‘Add new’
- Then click, ‘Upload theme’
- Select ‘choose file’
- Navigate to the .zip file you downloaded earlier, and select ‘Open’
- Click ‘Install now’. This will start the process to upload and install the Ultra WordPress theme.
- Once the theme is successfully installed, click ‘activate’, and you’re new theme will now be live on your website
You will then be taken to the Themify settings page. Once the Ultra theme has been installed, you can navigate back to this page at any time by hovering over the newly created tab called ‘Themify Ultra’, and selecting ‘Themify settings’.
Install and activate required plugins
- Click on ‘begin installing plugin’
- Select the required plugins and click install
- That will install the required plugins
- We’ll click on the option to ‘Return to Required Plugins Installer’
- To activate the plugins we’ve just installed, select the plugins and select ‘activate’
- Once any required plugins are activated, we can either return to the dashboard, or navigate back to the Themify settings by hovering over ‘Themify Ultra’ in the admin menu, and selecting ‘Themify settings’
Ultra theme documentation
Now that you have the demo content imported on your website, we can go through customizing your website. Below are the links to the Ultra theme documentation, Themify Builder documentation, and builder modules documentation
Step 5 | Customize your Portfolio Website
By now your WordPress portfolio website will be set up correctly with your WordPress theme installed along with any required plugins. We can now start customizing your Photography site to suit your style and goals.
This will include the following:
- How to import the demo content
- How to upload your logo, favicon, and style your theme using the customizer
- How to update the theme settings
- How to create pages, posts, and categories
- How to create a portfolio page
- How to use the Themify Builder
- How to update the menu and navigation
- And lastly, How to update the footer and sidebar
The first thing we’ll do is bring in the demo content from the live preview that resonates most with you.
Import the demo website content
You’ll notice that there are a number of tabs within the Themify settings panel. These include:
- Settings – this controls the global theme settings
- Skins & demos – allows us to leverage demo content to create a well designed and functioning website in minutes, with just a few clicks
- Transfer – allows you to import and export data for the Themify settings panel
- Update – is used to manage the version of the Ultra theme installed on your website
The tab we’ll look at first is ‘skins & demos’. Here, you have the option to import all the demo content, theme settings, widgets and menus to replicate exactly what you see on the Themify demo sites that can be viewed by:
- Clicking on the ‘view demo’ button from within the ‘skins and demos’ tab below each example
- Or, by heading to the Ultra theme page, and then scrolling down to the demos section and following the link to the specific demo site.
To select one of the skins, you just need to click on the skin you’d like to use and select ‘save’
Uploading the demo content
Once you’ve clicked on the skin you want to use, you’ll notice that you get the option to import the demo content. If you’ve already got content on your website, you won’t want to import the demo content.
However, if you’re starting from scratch and you want to use one of the demos as a starting point for your website:
- Then you’ll select ‘import’ to import the demo content into your website
- Depending on which demo you want to import, you will be prompted to download additional Themify builder plugins, which you will have access to as part of your Themify membership
To download the required plugins for your specific demo:
- From the Themify members area, scroll down to the ‘Builder Add-Ons’ section
- To download each plugin required for the demo you want to use, simply click on the specific plugin link to start the download
- Repeat this for every required plugin you want to use
To upload and install the required plugins for your demo:
- From your WordPress dashboard, hover over ‘plugins’ in the admin menu, and select ‘add new’
- At the top of the page, select ‘upload plugin’
- Click ‘choose file’
- Navigate to the .zip file for the first plugin you want to upload, select the plugin .zip file, and hit ‘open’
- Then click ‘install now’
- Once the theme has been installed successfully, select ‘activate plugin’
- Select ‘add new’ and repeat the process for the remaining plugins
Once you’ve installed the required plugins, navigate back to the ‘Themify settings’ panel by hovering over ‘Themify Ultra’, and selecting ‘Themify settings’.
Head back into the ‘Skins & Demos’ tab or refresh the page, and we can now select the demo we want to use. In this case, we’ll go with the agency skin, and click on the ‘import’ option to bring in the demo content for our website.
How to upload your logo, favicon and branding elements
So firstly, let’s take a look at how to upload your logo and favicon as well as set your brand color palette. These are your three most important branding elements and will play the biggest role in uniquely identifying your site to visitors. We’ll start with the favicon as this is conveniently located within the Theme Settings.
How to upload your favicon
- From your WordPress dashboard, hover over ‘Themify Ultra’, and select ‘Themifty Settings’.
- Within the ‘Settings’ panel, in the ‘General’ tab, expand the Favicon settings.
- Where it says ‘custom favicon’, click ‘upload’.
- Navigate to your favicon file and upload it.
- Once your favicon is there, save your changes in the top right corner.
How to upload your logo
- From your WordPress dashboard, hover over ‘appearance’ and select ‘customize’. You could also hover over ‘Themify Ultra’ and select ‘customize’.
- From within the Customizer, scroll down and click on the site logo and tagline option
- Here, we can amend the logo and the tagline for your website
- We’ll click on the site logo dropdown
- Here we can choose between using the site title as your logo, uploading a logo image, or setting no logo, we’ll choose the logo image option.
- To add your logo, we’ll click on the plus icon
- We can either upload your logo image, or choose an image from the media library
- We’ll drag your logo to add it to the media library
- Set an Alt text (which is good practice for all images)
- And click ‘insert image’
- This will add your logo to the header of your website
- It’s good practice to set a width or height parameter to ensure your logo doesn’t pixelate or look odd. In this case we’ll set a width parameter of 200px, by adding 200px to the first box
- If you want the logo to take the user to some place else other than the homepage when clicked, you can add a custom site logo link at the bottom
- To commit changes, remember to hit ‘publish’ at the top of the customize panel
How to update your WordPress theme Customizer settings
The theme customizer is where you have full access over all the global styling options for your website. To access the theme customizer:
- From your WordPress dashboard, hover over ‘appearance’, and select ‘customize’
- You could also hover over ‘Themify Ultra’ and select ‘customize’
- Either way, it will take you through to the theme Customizer
- You’ll notice that the Theme customize panel has two tabs, ‘basic’ and ‘advanced’
- Most of what we need will be in the basic tab, however as the name suggests, we can access more advanced options in the advanced tab if required.
Now, we’re not going to go through all of the options, however, what we will do is go through the most important ones like adding your logo, setting your brand accent colors, and updating the global fonts, etc. so that you have a solid understanding of how to use the theme customizer.
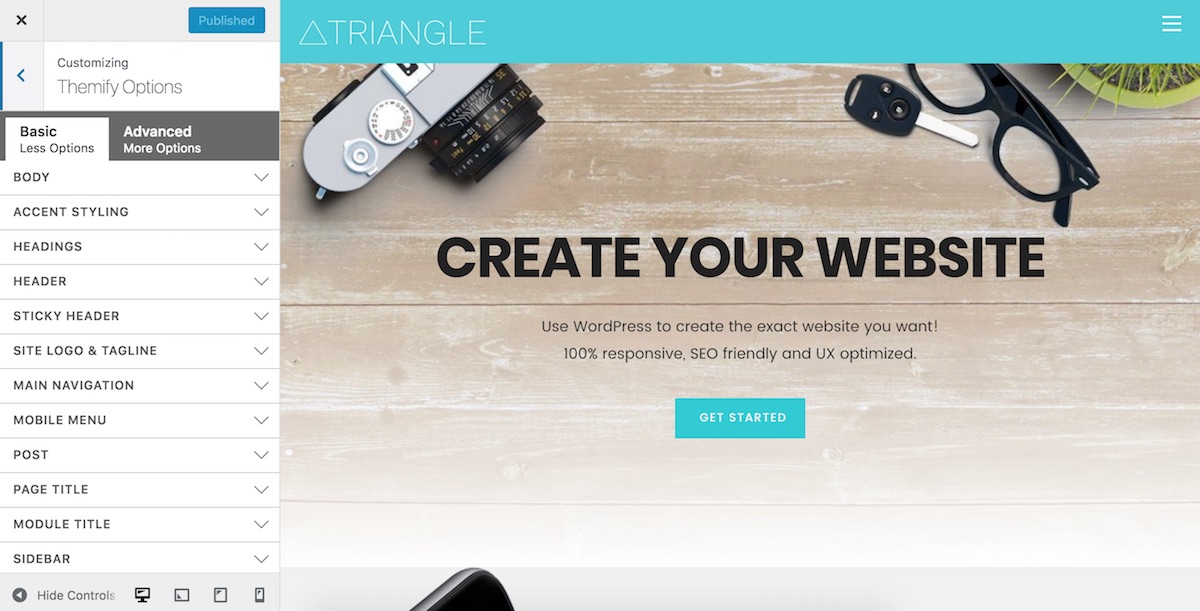
How to add brand colors to your website
Scroll to the accent styling tab which is where you’ll add your brand colors if you want to include them as accent colors on your website. To do this:
- Click on the accent styling options dropdown
- Here we can set your accent font, background, and link color by clicking on the color selector box
- You can either select a color, and its opacity
- Or, enter the hexadecimal or rgba color code of your brand color
- You’ll see the elements this affects in the preview panel on the right. Remember that these are global changes and will be applied to your entire site
- That being said, you are able to overwrite these settings via an individual page’s Themify custom panel, or via the Themify builder itself
- You can amend the header background color and other elements via the header options dropdown by selecting the header wrap option
- You can set the background color in this section
- Similarly, you can amend the sticky header options, by following the same process in the sticky header options panel
- The sticky header is the navigation header that sticks to the top of the page as the user scrolls down the page. This can be disabled via the Themify settings panel as we covered earlier
The best way to get up to speed with all the available options is to have a play around, and see what works best for your design. Reviewing the documentation and video guide for this section is also a great way to explore your options further.
How to update the global font settings
To amend the body and paragraph font:
- In the theme Customizer, click the body options panel
- Then choose the body font option
- Here you can choose from a web safe font, or a number of Google fonts
- Set the default paragraph font size, line height, font weight, letter spacing, as well as a number of stylistic options, and the font color at the bottom
- To commit changes, select ‘publish’ at the top
We can do the same thing to set our global heading styles. To do this:
- We’ll click on the headings option
- Click the heading type we want to amend, for example, Heading 3s
- Then select the font family you want to apply to all heading 3s, by selecting it from the dropdown
- You’ll see in the preview pane, that has now changed, and all the heading 3’s of h3s on the page will have that font applied
- You can also adjust the font weight, line height, etc to get your design looking just the way you want
We recommend setting your global font styles here as opposed to doing it on individual pages, primarily because, if you change your mind later and want to adjust anything, you only have to do it in one place rather than on every page. It will also ensure your design is consistent throughout your website.
Review the customizer tutorial and documentation for more details on any of the settings.
We’ll now move on to the global theme settings where we can begin customizing your website to reflect your brand and design style.
How to update your WordPress theme settings
The great thing about the Ultra theme is that there are so many options. What we’ll do in this section is cover the things that will be important to everyone, such as setting your favicon, amending your website’s header and menu layout, and setting the default layout for pages, posts, and other global elements.
To access the Themify settings, from your WordPress dashboard hover over ‘Themify Ultra’, and select ‘Themify settings’. We’ll go through the ‘settings’ tab, and cover off the fundamentals you need to know.
Before we jump into the Themify settings, it’s probably best if we explain a few things first, to ensure we’re all saying the same thing.
As far as published content goes, the basic architecture of WordPress includes static pages, individual posts, portfolio posts, and archive pages.
Static pages are the pages of your website where the content is relatively static. For example, your homepage, about, contact page, etc.
Individual posts are the blog posts you create that are relevant to your business, industry, or niche. Individual posts are grouped by categories which serve as an organization tool and provide additional context and meaning to users. Tags can also be added to individual posts.
Individual portfolio posts are most commonly used to showcase examples of work, or case studies, etc. These function in a similar way to individual posts, where they are associated with a category.
Archive pages are typically the category pages and showcases the individual posts or portfolio posts associated with that specific category. Essentially, these pages act as an archive of associated posts.
For example, if you had an accounting business and included a blog on your website, you may have a category called ‘Advisory’ with a number of individual posts related to relevant issues and strategies that your firm advises on.
If you were to click on the ‘Advisory’ category link on your website, you would be taken to the ‘Advisory’ category archive page, which would display all the posts related to the category of ‘Advisory’. This page is what’s referred to as an archive page.
Ok, so hopefully we’re all on the same page, and we can now run through the Themify settings.
General tab
- Upload favicon – favicon is the icon that appears in the browser tab when a user is on your website.
- Header code section – allows you to copy code snippets that will be added to the head tag for the pages and posts of your website. This is great for adding Google Analytics tracking code, or your Facebook pixel, etc. If you need to add any code to the head tag of your website, this is where you do it, without needing an additional plugin
Default layouts tab
This is where we set the default layouts for pages, individual posts, and archive pages as we discussed before.
A number of the layout options will include the placement of the sidebar on your website. The sidebar in WordPress is referred to as a widget enabled area and allows you to set a global sidebar that appears on all pages, posts or archive pages – where a sidebar is enabled.
Themify Ultra has two sidebar widget enabled areas that you can leverage – these are the standard sidebar and a narrow sidebar which you can include in your design.
If you’re new to WordPress, review the documentation to get your head around widgets and widget-enabled areas as they are a powerful feature. We will look at using widgets in a later section.
Theme settings tab
Under the theme appearance section, you can control the global appearance settings for your website. These include:
- Theme color & typography – Here you can access the basic settings, however, you have more control over these settings in the theme customizer panel.
- Header design – There are more than 15 header options that will dramatically impact the look and feel of your website. Depending on which header option you choose, the customization settings will vary.
- Footer design – This is where you’ll set your global footer design and widget structure.
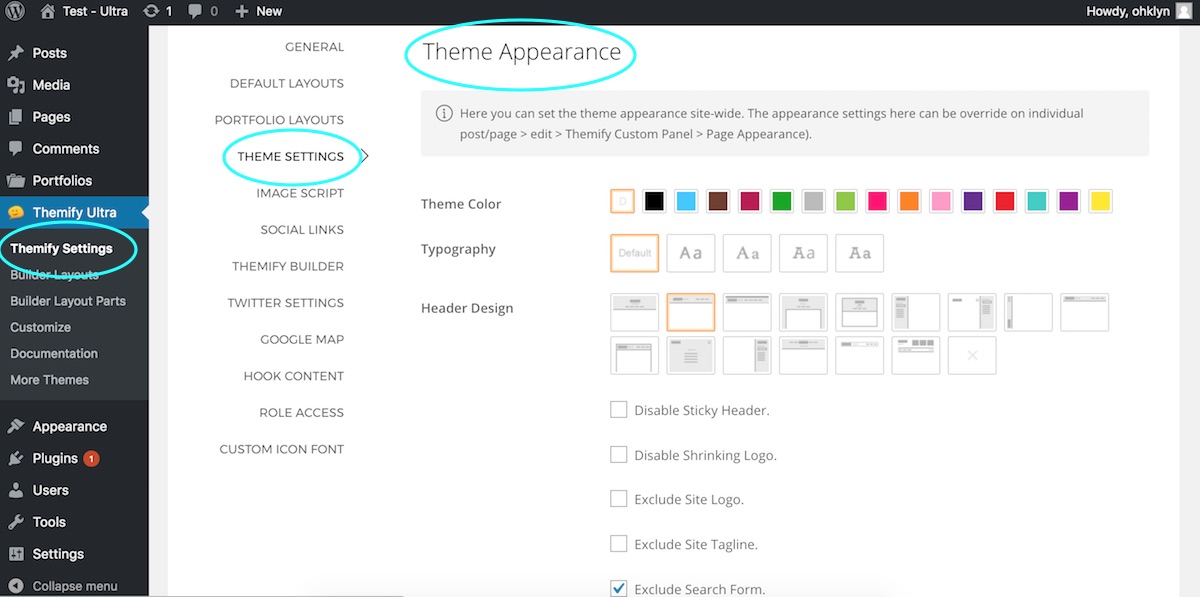
Social links tab
In this tab, you’ll manage the social platforms you want to include on your website, how they’re displayed, and add the links to your accounts.
How to add social media links in WordPress
- Scroll down to the bottom, and select ‘Add link’
- Give it a title, in this case ‘Dribble’
- Add your Dribble link in the link field
- To insert an icon, click on ‘add icon’
- Search for the icon you want to use, in this case Dribble, then select the icon you want
- You can drag the box to rearrange the order
- Then hit ‘save’
To amend the details of an existing social link, just update the details you want to change, for example, the link details, then select ‘save’ to commit the changes.
To delete a social link, simply click the ‘x’ icon, save your changes, and the social link is removed.
Ok, so those are probably the most important aspects of the Themify Builder. However, please go through the rest of the options and refer to the documentation for further details.
ULTRA THEME DOCUMENTATIONTHEMIFY BUILDER DOCUMENTATION
It’s worth noting that within individual pages and posts, you have the ability to override the Themify settings for a specific page, which is a really powerful feature allowing you even more control over the design of your website.
How to create web pages and posts
For this tutorial, we’ll create a new page, and set this as the homepage for our website so that you’re aware of how the homepage is set for your website.
How to create a new page:
- From your WordPress dashboard, hover over ‘pages’ in the admin menu on the left. To view all the pages on your website, click on ‘all pages’
- Alternatively to create a new page, click ‘add new’
- You could also hover over the ‘+ new’ option at the top of the page and select ‘page’
- Or, from the All pages tab, click on the ‘Add new’ button at the top
- The first thing you’ll want to do is give your page a name. If you’ve selected ‘post name’ as your permalink structure, this will be used to create the URL for this page. For this example, we’ll call this ‘Landing’
- If you’re new to WordPress, we recommend watching our How to Use WordPress tutorial, where we cover the default WordPress options available when creating pages
- On the right-hand side, you can select if you want to assign a parent page. This will impact the site hierarchy as well as permalink structure. In this case, we’ll leave the default of ‘no parent’
- If we scroll down, at the bottom you’ll see the ‘Themify custom panel’. We’ll go through setting the default global page settings shortly, but you’re always able to overwrite these for individual pages in this section
- We’re going to load in one of the pre-designed layouts, which is a full-width layout with no sidebar, so in the page options tab, we’ll set the ‘sidebar option’ to ‘no sidebar’
- And, we’ll set the content width to full width
- We’ll also select ‘yes’ for the hide page title option
- This will create a clean slate for us to bring in the pre-designed layout
How to add a pre-designed layouts
- Scroll up to the top of the page and click on the ‘Themify builder’ button to launch the front end builder
- If it hasn’t already launched, click ‘turn on builder’ in the toolbar at the top
- In the Themify builder menu at the top, hover over the layouts icon and select ‘load layout’
- You can either search for a specific layout, view the layouts by category, or scroll through the available options
- You can preview layouts by clicking on the search or view icon
- Select the layout you want to use by clicking on the layout
- You’ll be asked if you want to replace or append the layout to the existing page content. Choose the option you want
- And the layout is now loaded into the page
How to set the homepage for your WordPress website
- Hover over ‘Settings’ in the admin menu and click on ‘reading’
- Under the ‘Your homepage displays’ options, make sure that ‘a static page’ is selected, and then choose the page you want to set as your homepage from the homepage dropdown list
- If you go to the homepage of your website, you’ll see that the page you selected is now your homepage
Go through and create the rest of the pages that you want to include on your website by following the same process. Paint in broad strokes for now, as we’ll get to how to use the Themify builder to customize your pages shortly.
How to create posts and categories
If you want to include a blog on your website, you’ll create blog posts the same way. The only difference is that you’ll need to set up categories first.
How to add the blog categories
- From your WordPress dashboard, hover over posts, and select categories
- Enter in the category name
- And selecting ‘add new category’
- Repeat this process for all the categories you want to include in your blog
How to create a blog post
Once you’ve created your categories, to create a new blog post:
- Hover over posts in the admin menu and select ‘add new’
- You’ll add a title
- And your content
- Select the category for the post on the right-hand side
- Assign a feature image by clicking on the ‘set feature image’ option on the right-hand side
- And either uploading an image or selecting one from the media library
- Then, preview or publish your post
The default blog page will feature your recent posts unless you create a custom blog page and set it as your blog page via the reading settings tab like we just did for the homepage.
How to create a portfolio
Portfolios work much in the same way as blog posts and categories when it comes to WordPress and Themify Ultra. You can create categories under which to arrange your various portfolios – the only difference is that you will be using the Portfolios section of WordPress instead of the Posts section.
How to create portfolio categories
- From your WordPress dashboard, hover over portfolios, and select portfolio categories
- Enter in the category name
- And selecting ‘add new category’
- Repeat this process for all the categories you want to include in your portfolio
How to create portfolios
- Hover over portfolios in the admin menu and select ‘add new’
- You’ll add a title
- And your content
- Select the category for the portfolio on the right-hand side
- Assign a feature image by clicking on the ‘set feature image’ option on the right-hand side
- And either uploading an image or selecting one from the media library
- Then, preview or publish your post
You can customize your portfolios the same way as pages by importing demo layouts. Ultra comes with a number of portfolio, resume, or similar page layouts that you can take advantage of. In the Themify Builder section, we will take a look at how you can use the Builder to customize these pages. As a side note, you may want to create individual pages or posts for projects and then link to multiple projects in the same portfolio. We will show you how to create these links later on.
For more details on anything we covered (or didn’t get a chance to cover) in this tutorial, follow the links below to the Ultra or Themify Builder documentation pages. Here, you can access over 10 hours of detailed content, covering every element of this theme.
ULTRA THEME DOCUMENTATIONTHEMIFY BUILDER DOCUMENTATION
How to use the Themify Builder
To ensure you’re comfortable using the Themify Builder, we’ll go through an example of how to customize one of the pre-built layouts to suit your website design. We’ll also show you how to create a page from scratch using the Themify builder modules and prebuilt rows.
As everyone’s needs will be different, it wouldn’t make sense for us to go through all of the options here. Instead, we’ll cover the fundamentals of how to use the builder, and get you up to speed with the most common features. If you want to dive deeper into anything along the way, refer back to the theme documentation that we’ve provided the links to.
How to launch the Themify Builder
From the backend of any page on your website:
- Click on the ‘Themify Builder’ button
- Then click the ‘turn on builder’ option from the toolbar at the top if it hasn’t launched already. This will activate the drag and drop page builder, which is one of Ultra’s best features.
How to load a pre-designed layout
- In the Themify builder menu at the top, hover over the layouts icon and select ‘load layout’
- You can either search for a specific layout, view the layouts by category, or scroll through the available options
- You can preview layouts by clicking on the search or view icon
- Import the layout you want to use by clicking on the layout
- You’ll be asked if you want to replace or append the layout, select the option you want
- And, the layout will be loaded into the page
How to create a page layout from scratch
Once you’ve created a new page and activated the Themify Builder:
- From here, we can either build a layout from scratch or use one of the prebuilt rows to start your design by hovering over the plus icon at the top, navigating to the ‘rows’ tab and then choosing a specific row
- As an example, you could start your page by using the ‘hero banner’ row
- To add it to your page, click on it and drag it across to the very top of the page, and drop it in
- From here we could customize the elements by double-clicking on the element we want to update, say the title text, for example, adding in a new title, and clicking ‘save’
- In the same way, we could add additional rows. For example, we could add the ‘features’ row by clicking on it and dragging it across
- You could continue down and build out your page by following this approach
Refer to the documentation guide below, or the video included in this tutorial, for more practical and in depth examples.
THEMIFY BUILDER DOCUMENTATIONTHEMIFY BUILDER MODULES
How to create and manage menus
By now, you should have roughly created the pages, posts, and categories for your website. Don’t worry if it’s not perfect or if you’re not 100% sure on the exact structure – remember broad strokes.
What we’ll do now is go and create the menu structure for your website, so you can easily navigate through your website while you continue to build out your layouts and content.
Menus in WordPress are created and managed in the dedicated menus section which you can access by hovering over ‘appearance’ in the admin menu, and selecting ‘menus’.
On the left, you have the available content that you can add to your menu, such as:
- Pages
- Posts
- Custom links
- Categories, etc
To add more options, click on the ‘screen options’ tab at the top and check the boxes next to the elements you want to add to your menu. For example, ‘tags’.
Under ‘screen options’, you can also enable the ability to set the link target for a menu item, which means whether the link opens in a new tab or not, as well as assign CSS classes, which is slightly more advanced than what we’ll cover today.
However, if you’re interested in learning some HTML and CSS fundamentals for WordPress, register for one of our courses at courses.ohklyn.com.
On the right-hand side of the menu panel, you have your menu structure. If you uploaded the demo content, a main menu and a footer menu would’ve been created for you. If not, you’ll need to create a new menu.
How to create a new menu in WordPress
- Click on ‘create a new menu’
- Enter a name for the menu (this is for your reference)
- Then select ‘create menu’
- Down the bottom, you can select where you want this specific menu to be displayed as either the main navigation menu
- Or the footer navigation menu, located in the footer of your website
- We’ll set this menu as our main navigation menu
How to add menu items to your WordPress menu
- Select the elements from the left
- Then click ‘add to menu’
- You can rearrange the order by clicking and dragging the menu items into place
- Similarly, you can create menu hierarchy by clicking and dragging the menu item across to sit underneath the item above
- Then save the menu
You can also add custom links to your website’s menu. To do this:
- Click on the custom menu link option on the left
- Add the URL for where you want the menu item to link to
- Add the link text that you want featured in the menu
- Then click ‘Add to menu’ and drag it to where you want it to be positioned in the menu
To amend the footer menu, you’ll approach it in the same way:
- By either selecting the footer menu that was created with the demo content and amending the menu items
- Or, creating a new footer menu following the steps we just went through
One great feature of the Ultra theme is the ability to include mega menus which are great from a UX perspective as they allow you to show large amounts of information in an efficient way.
How to add a mega menu in WordPress
- Click on the parent menu item
- Under the mega menu option, select the ‘mega posts’ or ‘fullwidth columns’ option from the dropdown
- And then hit ‘save’
Remember to refer to the documentation for further information regarding the menu options available with the Ultra theme.
Widgets are managed in their own dedicated section which you can access by hovering over ‘appearance’ in the admin menu on the left, and selecting ‘widgets’.
- On the left, you have all the available widgets
- And on the right, are the widget enabled areas
- You’ll see the two sidebar areas, plus the social widget area that sits in the header
- As well as the footer social widget area, that sits in the global footer
If you imported the demo content, there may already be widgets added to the various sidebars and other widget areas.
How to manage widget enabled areas
- Simply click on the widget on the left
- Select the widget enabled area you want to add the widget to
- And select ‘add widget’
- Once the widget has been added, you can drag it into place
- Click on the widget to amend its settings
- Once you’ve updated the widget, hit ‘save’
To delete a widget, click on the widget, then select ‘delete’
Next steps
When you have your portfolio website looking the way you want and you’re ready to launch, there’s a few best practices that you should follow to ensure you get the best results.
If you want your website to be searchable via search engines like Google, the first thing is to ensure that your WordPress settings aren’t blocking search engines from indexing your website. To check this:
- From your WordPress dashboard, hover over settings in the admin panel and select ‘reading’
- Scroll down to the bottom to the Search Engine Visibility section
- Ensure the box is unchecked so that Google can crawl and index your website
Keep this box checked while you’re still working on your site, but uncheck it once you’re ready to go live.
Once you’ve done that, we recommend watching our step by step video on how to add your website to Google Search. This will help make your website discoverable via search engines like Google.
We would also recommend installing Google Analytics on your website. Fortunately, we’ve created a free step-by-step video on how to do this as well. Using the Ultra theme, you can add the required tracking code within the Ultra Theme Settings tab, under ‘General’. We cover how to do this in the video.
That’s it for our how to make a Portfolio WordPress website tutorial for 2018 and 2019. We hope you are now well on your way to launching your new photography WordPress website and look forward to seeing your results.

