In this tutorial, we’ll go through the steps of how to make an online store for 2018. This WordPress eCommerce tutorial is really well suited to those who want to create an online store with a smaller product range, or for products with less variations.
If you sell a specific product line, digital products, courses, link to affiliates, and see blogging or content marketing as a big part of your eCommerce strategy. Then this tutorial is for you.
If that’s not you, then check out our how to create an eCommerce website tutorial, where we go through the process step-by-step of setting up a more ASOS styled website. The theme used in that tutorial has a lot more filtering options, and is great for a fashion store, or other product types that have a number of attributes and variations (like size, color, brand, etc), where users will want to filter by those attributes.
VIEW DEMOBLUEHOST DISCOUNTWP ENGINE DISCOUNT
Here’s what we’ll cover is this WordPress WooCommerce tutorial:
- Preparation
- Register domain, setup hosting, & install WordPress
- Explore demo + eCommerce fundamentals
- WordPress overview for beginners
- Choosing and uploading your WordPress theme
- Installing the required plugins (WooCommerce)
- WooCommerce tutorial
- Customizing your eCommerce website
How to make an online store with WordPress 2018
The big standout for this online store tutorial over others, is the blog design and options you’ll get access to. Not only will you be able to create an effective online store, but we’ll go through leveraging the many blog layout options to assist in building your community and driving traffic to your eCommerce store.
1. Preparation
For this you’ll want to think about how you’ll group products (via categories, tags, etc), as well as how you’ll use your blog to assist in driving traffic to your site, or additional pages such as an FAQ page, contact or terms of use page to improve the user experience and communication flow. You’ll also need to put together any branding assets, such as your logo, hero images, and the color pallette you want to use for your site.
In regards to the products you intend to sell on your website, you will need to put together the following for each:
- A product title – the name for each product, this should be relevant and descriptive as it will impact your SEO efforts.
- Descriptions – you will need to put together a short and long description for each product. These will be featured on the individual product pages.
- SKUs, or Stock Keeping Units – which you will use to identify unique products. This will be forward facing and displayed on the front end of your site, so pick something customer-friendly.
- Product types – we’ll cover these off in more detail shortly, but this includes simple products, for example a pair of sunglasses. Or, variable products like a pair of shoes (which has a number of colors and/or sizes – these are referred to as attributes. But we’ll get to this in a bit).
- Prices – you will need the regular price for each product as well as a sales price (if appropriate).
- Stock – the quantity or number of each product. By managing this within the back end of your site, you’ll be automatically show when products are running low or out of stock.
- Images – this should include both a feature image, as well as additional supporting images, referred to as gallery images. To mimic the design on the demo site, we would recommend using an image size of 690px wide x 1035px high. You will need to update your WooCommerce products image settings, which we’ll cover off later. Remember to keep the file size for your images as small as possible (always less than 500kb), so it doesn’t impact your page load speed.
- Categories – this is probably the most important aspect and something you should take time to consider, as it will impact the way you layout your online store, and how users will navigate your site. You should group products in ways that make the most sense for your product range.
- Tags – unlike Categories this doesn’t need to be hierarchical, rather a way of providing additional information related to the item. For example, type of material, which collection it’s from, etc. Try not to go overboard with tags. Tags don’t have an impact on SEO, contrary to popular opinion, so stuffing your products with tags will only make things congested, as they will be visible on the front end. The types of tags that do impact SEO, are what’s referred to as meta tags. To learn more about SEO for WordPress and eCommerce, check out one of our courses.
2. Register your domain, setup hosting, & install WordPress
Your domain, or url – is the web address for your online store, and is what users will type into their browsers to access your site. For OHKLYN, it’s ‘ohklyn.com’. Pick something that’s relevant and memorable.
Hosting – is what allows your online store to be accessible to users 24/7. It’s the process of storing the content and data of your eCommerce website on a web server, and serving it to users.
For this tutorial, there’s two options to choose from, and we’ll quickly walk you through getting started with each. The first is the cheaper shared hosting option through Bluehost, and the second is the premium option through WP Engine. We use both providers, OHKLYN is hosted on WP Engine, and our demo sites are hosted on bluehost. There are discount links to each option below.
VIEW DEMOBLUEHOST DISCOUNTWP ENGINE DISCOUNT
Bluehost – Getting started
Steps to register your domain & set up hosting:
- Head to the bluehost website (massive hosting discount up to 54% + FREE domain)
- Select ‘get started now’ for the plan you want (shared hosting will be fine for most users & you can always upgrade later)
- Choose the hosting plan that’s right for you, hit ‘select’
- Either use your existing domain, or type in the domain that you want, then hit ‘next’
- Enter in your details, and make payment
- Select ‘no thanks’ to the add-ons and then navigate to the dashboard
- You will receive a welcome email from bluehost with all your details, and an email titled ‘WHOIS Verification for..’ – click the link in this email to verify your ownership of the domain
The free domain extension included are: (.com, .online, .site, .website, .space, .tech, .store, .net, .org, .info, .co, .us, .biz, .club).
If you want a specific top level domain (TLD) or country specific domain not listed above, you will need to purchase it through a domain registrar like GoDaddy or CrazyDomains. You will also need to change the domain nameservers or (DNS) records to point at Bluehost’s servers. Here are the steps on how to change domain nameservers to point at bluehost.
Steps to install WordPress:
- From your Bluehost dashboard, scroll down to the ‘Website’ section and click ‘Install WordPress’. This will start the WordPress install process.
- Select ‘Continue installation’.
- Select the domain that you would like to install WordPress on from the dropdown box.
- In the ‘Admin information’ section, enter the name of your blog and create your admin user details (admin name, email, and password).
- Leave the boxes checked, and click ‘Next’. This will start the WordPress installation on your domain
- You will receive a confirmation message once WordPress has been successfully installed on your domain. Click the ‘View your credentials’.
- Follow the link through to the ‘Installation location’, or add /wp-admin to the end of your domain to access the backend of your website.
- Finally, enter the admin username and password you created earlier and select ‘log in’, to access the back-end of your new website.
VIEW DEMOBLUEHOST DISCOUNTWP ENGINE DISCOUNT
WP Engine – Getting started
Steps to set up hosting:
- Head to the WP Engine website.
- Scroll down to the plans section and select the plan you want. Click ‘Host my website’.
- Select your subscription term and add-ons.
- Enter your personal info, and select your data centre. If you’re in Europe, use one of the European data centers, otherwise pick the US data center.
- Add your billing information, review the terms, and click ‘Create my site’
- Your WP Engine portal will now be built for you. WordPress will be installed for you, all you will need to do is point the DNS records for your domain at WP Engine.
How to point domain atWP Engine
- From your WP Engine get your CNAME record details (yourinstall.wpengine.com)
- Login to your domain registrar account, go to the DNS management section and point the A record ‘@’ to the CNAME (yourinstall.wpengine.com).
- You may want to set up an auto-forward on your domain from http://yourdomain.com to www.yourdomain.com
- Check out this video for more info
3. Explore demo + eCommerce fundamentals
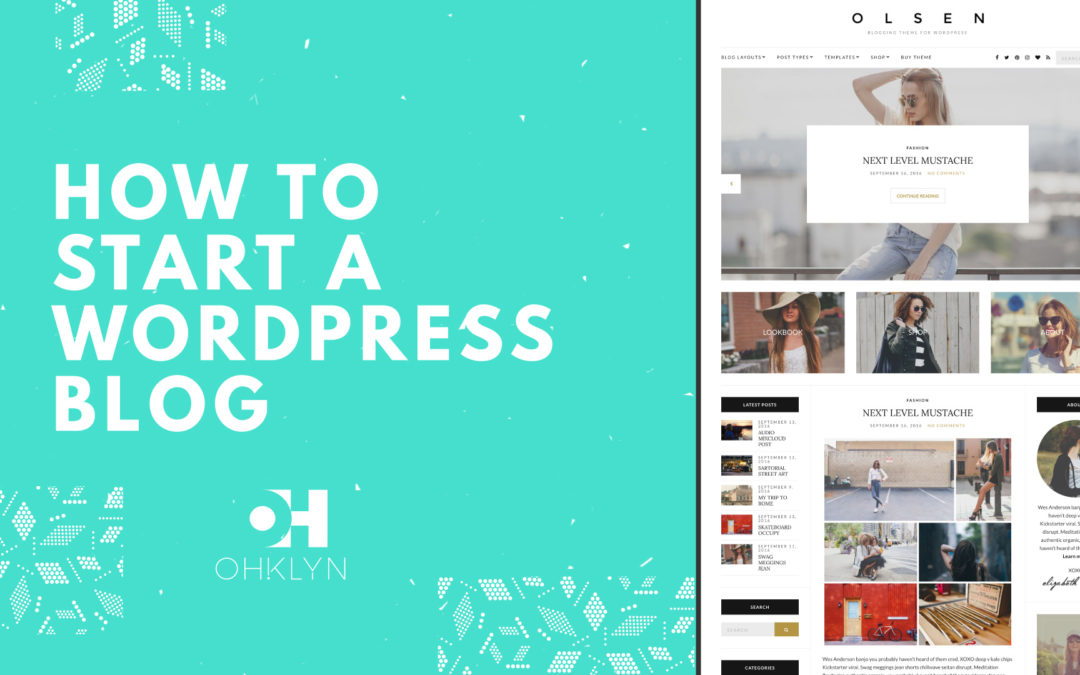
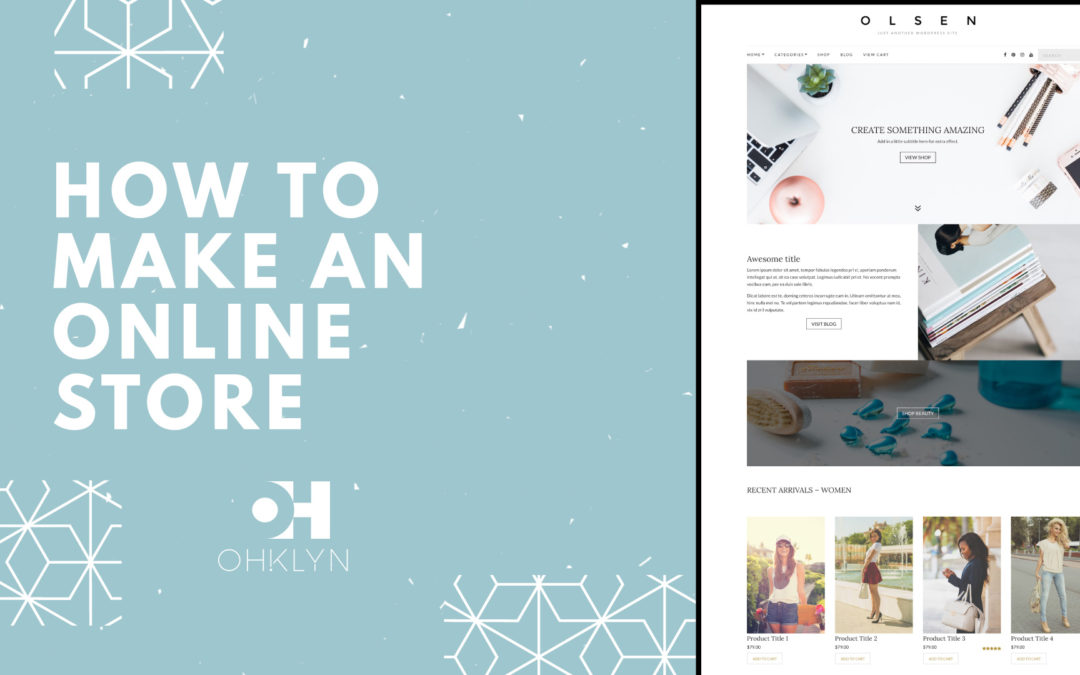
We will be using the Olsen theme by CSSIgniter. For the website, or ecommerce enabled blog that we’re going to build, there are three main homepage design options for you to choose from, these are to set the:
- Shop page as your homepage
- Blog frontpage, with shop or category links as your homepage, or
- Create a custom homepage from one of our free pre-designed templates using the Divi Builder
VIEW DEMOBLUEHOST DISCOUNTWP ENGINE DISCOUNT
eCommerce fundamentals – WooCommerce
Once of the biggest aspects of running an eCommerce store, is managing products. Within WooCommerce, there are a number of different types these include:
- A simple product – one that doesn’t include any attributes or variations like size or color.
- A variable product – which is a product that does have attributes or variations, such as size or color. This product type includes a dropdown for the user to select the specific attributes of the product they want.
- Grouped products – allow you to group multiple products together as ‘suggested’ packages, where the user can opt for the number of each item they want. This is done by creating a new product, and pulling in other products to create a set or group.
- An external or affiliate product – if you’re a blogger, or affiliate marketer, this theme handles external or affiliate products really well with the ability to input custom external links, and amend the button text for each product.
Once you’ve created the specific types of products for your online store, you’ll want to display them on specific pages. In WooCommerce we do this by using shortcodes, which give you the option to display products in a number of unique ways. These include:
- Products by category – this shows you the categories and the number of products grouped within each category. From here the user is able to navigate to view all the products within a category, by clicking on the specific category.
- Products by product ID – This allows you to list and show only specific products on a page or within a section, irrespective of which category they are from.
- Best selling products – this is based on your sales data, once you’ve processed some transactions.
- Products on sale – showcases all the products currently on sale.
- Recent products – which shows the newest products added to your store.
On the WooCommerce website, there is a list of all the shortcodes available for use on your website.
WooCommerce resources:
4. WordPress overview for beginners
WordPress is a powerful content management system (CMS), and has been popularised mainly because of its intuitive user interface. We have put together a comprehensive video tutorial on how to use WordPress, that we’d recommend watching if you’re new to WordPress.
Some of the aspects you’ll need to become familiar with include:
WordPress settings – WordPress settings control the global settings for your WordPress website and is broken into six components:
- General: Here is where you set your site name and tag line, assign an admin email account for your website, and set the language and timezone for your website amongst other things.
- Writing: The writing settings allows you to set a default post category and post format for your blog posts. You can also enable the ability to post to your blog via email.
- Reading: From here you are able to set the homepage for your website, adjust how many posts are displayed on index pages, and most importantly toggle on and of the visibility of your website to search engines.
- Discussions: This is where you manage how and when comments are displayed on your site and how users can interact with comments. These will change depending on your preference.
- Media: You can amend the default image sizes that are created by WordPress anytime you upload an image. Generally these settings won’t need to be amended. If it’s required, your theme documentation will advise you on the appropriate settings.
- Permalinks: These relate to how permalinks or urls are created on your website. By default this is set to day and name to reflect a journal, however I would recommend changing this to ‘Post name’, as it will clean up your url string to represent the post name. This is the most common option, and is arguably a preferred option from an SEO perspective. Set whichever you want, but try not to change this later as it will break your url links.
WordPress user types – Under the All user tab you can view and manage all users of your website, including deleting users, and amending access levels and user settings.
- Subscriber – is the lowest level of access and are created when someone registers to your website. With this access level they can only see and manage their own user profile.
- Contributor – is the next level of access. They only have the ability to create, edit and delete their own unpublished posts. They are unable to upload or edit media, publish posts, or edit or delete their posts once they’ve been published.
- Author – has the same access as the contributor, except that they are able to publish edit and delete published or unpublished posts as well as upload media items.
- Editor – has a greater level of access including all of what an author has, plus the ability to view, edit, delete and publish other user’s posts, as well as manage categories and comments.
- Administrator – is the highest level of access and has full control over your site. Be careful who you assign this role too, as they have the ability to change everything, including user accounts.
When we install the WooCommerce plugin, two new user types will be created:
- Customer – which is created when someone checkouts on your site. This allows them to view order details, and order history. As well as edit their customer account.
- Shop Manager – if you decide to hire someone to manage your online store, you can assign this access level. This will allow them to edit the WooCommerce settings, products, and view WooCommerce reports. It has the similar level of access as the Editor role.
Content management in WordPress
- Posts – posts are used to publish any ‘blog content’ and typically associated with a category or grouped within a specific topic. By default, posts displayed are pulled into a homepage or blog page in reverse chronological order with more recent and relevant content visible immediately for users.
- To create a new post, go to your WordPress dashboard and click ‘Posts’ > ‘Add new’, or click on the ‘+ New’ icon at the top and select ‘Post’.
- Pages – pages in WordPress are used for more permanent and timeless content that is likely to remain relevant for a longer period of time – For example, a homepage, about, contact, or an FAQ page.
- To create a new page, go to your WordPress dashboard and click ‘Pages’ > ‘Add new’, or click on the ‘+ New’ icon at the top and select ‘Page’.
- Media – the media section of WordPress is where you upload all your images and other assets. It is recommended that you avoid uploading videos to your WordPress media library. Instead, use a video hosting service like YouTube or Wistia, as hosting videos on your WordPress host will drain your resources. > ‘Menus’ or by navigating to the menus tab under ‘Appearance’ > ‘Customize’.
- To upload media, go to ‘Media’ > ‘Add new’ and either select the files from your computer or simply drag and drop them into the library. Try to keep image files as small as possible (typically no larger than 500kb) as larger files will slow down your website’s page load speed.
- Menus – menus are the primary vehicle for users to navigate through your WordPress website. By default every theme will have a primary navigation menu, however, many themes will provide you with the option to have multiple menus, as well as mega-menus.
- You can create a menu by navigating from your WordPress dashboard to ‘Appearance’ > ‘Menus’ or by navigating to the menus tab under ‘Appearance’ > ‘Customize’.
- Widgets – widgets are components designed to serve a specific purpose that you can add to any widget enabled area on your website (such as the sidebar or footer). Common widgets include the search widget, recent posts widget, categories widget, text widget (that enable you to add text, images, links, and certain code snippets). There are also theme and plugin specific widgets which bring in additional functionality.
- Access the widgets panel by navigating to ‘Appearance’ > ‘Widgets’, or via the theme customizer which can be located in the menu under ‘Appearance’ > ‘Customize’ and by navigating to ‘Widgets’.
Theme settings / customizer – Although the theme customizer settings will be different for every WordPress theme, the process for customizing your website will be similar.
You will access your theme customizer settings one of two ways – Either via the ‘Appearance’ tab by selecting the ‘Customize’ option, or by clicking on the theme specific settings tab that would have been added when you uploaded and activated your WordPress theme. We will cover this off in the next step.
5. Choosing and uploading your WordPress theme
A WordPress theme is a group of files that work with the underlying WordPress software to enhance the design and functionality of your WordPress website. For a more detailed overview check out our What is a WordPress theme article.
In this tutorial, we’ll use the Olsen theme by CSSIgniter. If you don’t like the design of this theme, check out our review of the best eCommerce themes for WordPress, choose one from there, and follow along with the steps in the video.
GET OLSEN THEMEBLUEHOST DISCOUNTWP ENGINE DISCOUNT
Steps to upload and install a WordPress theme
- Go to the CSSIgniter website, and purchase a copy of the Olsen Theme
- Navigate to the member area, select the Olsen theme, and click on ‘WordPress’ to download the theme file.
- Once you’ve downloaded your theme (.zip file), from your WordPress dashboard, navigate to ‘Appearance’ > ‘Themes’, and choose ‘Add new’.
- Select ‘Upload theme’, click on ‘Choose file’, and navigate to the .zip file for your theme you want to upload.
- Hit ‘Open’, then ‘Install Now’. That will do its thing, and once it’s installed successfully you’ll get a confirmation message stating that the theme installed successfully.
- Select ‘Activate’, and you’re all set.
6. Installing the required plugins (WooCommerce)
The next thing we need to do is install some plugins that are leveraged within this theme. These will vary depending on the theme that you’re using. In this case we’ll install:
- WooCommerce – this will give our website eCommerce functionality.
- Socials Ignited – this allows you to create a widget that links to all your social profiles.
- Contact Form 7 – if you want to include a contact form on your website, you’ll install this plugin. Contact form 7 is a solid form plugin, however it’s not the most intuitive to use. I’m gonna walk you through it, so we’ll get this option working for you. However, there are some more intuitive drag and drop options like NinjaForms, WPForms, or gravity forms, I’ll add links in the description below. Alternatively you can integrate a form from your CRM if you opt to use one. With the Divi Builder plugin there is also the ability to use the form module from within there.
- WP Instagram Widget – which will allow us to include an Instagram feed in the footer or sidebar of our site
- Widget Importer & Exporter – to bring in the widget layouts used in the example site.
- Divi Builder – if you want to use one of the custom homepage options, or create your own design, we’ll use this to easily create the layouts, via a drag and drop interface.
Additional recommended plugins (optional): Security / Analytics
- Cerber Security & Limit Login Attempts, or Wordfence Security.
- WooCommerce Google Analytics Integration
Steps to install a plugin
- From your WordPress dashboard, hover over Plugins in the admin menu, and select ‘Add new’.
- Search for the plugin you want to install, or upload a plugin, by selecting ‘upload plugin’ and selecting the plugin file.
- Hit ‘Install now’.
- Then, ‘Activate’.
With plugins, you always want to check the number of active installs, the star rating and # of reviews, when it was last updated, and if it’s compatible with your version of WordPress.
7. WooCommerce tutorial
By now, you should have installed and activated the WooCommerce plugin. If you haven’t done that yet, from your WordPress dashboard head to ‘Plugins’ > ‘Add New’. Search for WooCommerce by automattic, select Install, and activate.
In the video above, we went through how to use the installation wizard to get started, which is an optional step. The first thing you’ll need to do, is go through the WooCommerce settings, some of which will already be populated if you went through the steps in the welcome wizard.
From your WordPress dashboard, hover over WooCommerce, and select ‘Settings’. From within the WooCommerce settings area, you’ll notice there’s a number of tabs. These include general, products, tax, shipping, checkout, accounts, emails, and API.
Rather than me go through these with you, WooCommerce have put together detailed video tutorials on all the setting options and what they mean for each tab. To access these these go to the general tab under ‘WooCommerce’ > ‘Settings’ > ‘General’. In the top right hand corner, select the ‘help’ dropdown. Within there, you will see ‘Guided tour’ tab, and included in there is a detailed video walking you through every option within this tab.
These are accessible on most WooCommerce related tabs within WordPress.
WooCommerce resources:
8. Customizing your eCommerce website
Ok, so we’ve covered off the fundamentals of WordPress and running a WooCommerce store. These are the things that will be consistent, regardless of the theme you use. What we’ll do now is upload the demo content for our WordPress theme and go through the customization settings to get you your store looking just the way you want. To do this, we’ll go through the theme documentation, and make edits as we go.
Uploading demo content
As per the documentation, once we’ve installed all the required plugins, we can then import the demo content. You can download the demo content from within the member area of the CSSIgniter site if you haven’t already, or there’ll be a notice at the top of your WordPress dashboard with a link to where you can download the sample content.
Steps to upload demo content
- Login to your member area of the CSSIgniter website, select on the Olsen theme, and click on ‘sample content’. This will download the demo content as a .zip file.
- Unzip the file. You will see a .xml file which will contain all the products, pages, and posts data and layouts. The other folder is a .wie which will import all the widget info and layouts from the demo site.
- To upload the .xml file, from your WordPress dashboard, hover over ‘Tools’ and select ‘Import’.
- Scroll down until you see the ‘WordPress’ option, and select Install Now’.
- Once, the importer is installed, select ‘Run Importer’, select ‘choose file’, navigate to the .xml file you downloaded and click ‘Open’.
- Once you’ve done that, select ‘Upload file and import’. You will need to assign the demo content to an author. Assign this to the admin user you created earlier.
- Check the ‘Download and import file attachments’ box, and hit ‘Submit’. This may take a up to a minute or so to import all the demo content.
- You will see a message saying ‘All done. Have fun!’ once it’s imported successfully. If it times out or takes longer than 5 minutes. Just start the process over again.
Once the content is all imported, we’ll upload the widget content. To do this:
- Hover over ‘Tools’ in the admin menu, if you’ve installed the Widget Importer & Exporter plugin, you will see ‘Widget Importer & Exporter’ as an option, click on this option.
- Under the import widgets section, select ‘Choose file’, navigate and select the file with the .wie extension, and hit ‘Open’.
- Then select ‘Import Widgets’. Once all components have imported successfully, you can move on.
Theme customization settings
If you want to edit and of the global theme settings for your website, you will do this within the Theme Customizer.
To navigate to the theme customizer, from your WordPress dashboard, hover over ‘Appearance’ and click on ‘Customize’. This will take you into the theme customizer. Note that any changes you make to the settings below will be previewed live in the panel on the right side of the screen, however to commit these changes you’ll need to click the Save & Publish button at the top of the panel.
Review the theme documentation, or follow along with the video above to go through customizing each of these settings.
Integrating MailChimp into your online store
To add a newsletter signup to your sidebar widget using your MailChimp embed form, follow the steps in the video. Then, add the custom CSS below to the ‘Add your own MailChimp form style…etc’ part of the MailChimp Embed code.
MailChimp CSS code to be added within newsletter widget
 /*---MailChimp Widget Newsletter styling---*/
 input[type="email"], input[type="submit"] {
 margin-top:15px;}
Alternate: MailChimp CSS code to be added custom CSS section within theme customizer
 /*---MailChimp Widget Newsletter styling---*/
 .sidebar input[type="email"], .sidebar input[type="submit"] {
 margin-top:15px;}
Save the changes, and view the blog page from the front. You now have your MailChimp newsletter signup integrated within your sidebar. In the video, we go through updating the WooCommerce shortcodes, and the contact form, so check out the video for more information.
Summary & next steps
What I would recommend doing now, is familiarizing yourself with the demo theme content and take inspiration from the layouts and what you can repurpose for your website. I typically create a number of new products, posts, and pages with my own content, based on the examples in the demo content. Once i’m feeling comfortable with how to create and format products, posts and pages, I then delete or change the status to draft for the demo posts, pages, and products.
The value in keeping them in draft mode is that they won’t be visible on your site, but they are there if you ever need to reference the layouts, or how they were formatted.
I would then go in and delete any tags or categories that you won’t be using for both posts or products, and create new categories that work for you. Once you’ve done that, reassess your menus, and widgets. Remember, if you get stuck with anything, you have access to premium support, and the support forums on the CSSIgniter website – which are great.
That completes our How to make an online store tutorial for 2017 & 2018. We hope you’ve learnt a lot from our WordPress eCommerce tutorial, and feel confident to put together an online store using WordPress and WooCommerce.
Remember that you’ve got premium support with CSSIgniter, as well as access to their support forums. Similarly, you also get access to support with Bluehost, and premium support included with WP Engine, if you need one-on-one help.