
In this article, we’ll cover the process of how to add your website to Google. For this example, we’ll show you how to index your WordPress website step by step using the Yoast SEO plugin and Google Search Console.
However, for those not using WordPress, the process will be the same, the only difference being that you’ll use an alternate approach to generate your sitemap and ensure the Googlebot can crawl your site.
Here’s a summary of what we’ll cover in this article:
- 3 Steps to add any website to Google Search
- How to add your WordPress website to Google Search
- How to ensure the Googlebot can crawl your site (robots.txt)
- How to install and configure the Yoast SEO plugin.
- How to use Google Search Console to index your site.
Watch it on YouTube: How to add website to Google search
3 steps to add any website to Google Search
We’ll go through this process step by step for WordPress users below, however, the process regardless of which platform you’re using is:
- Ensure the Googlebot can access the pages of your website that you want to be indexed. This relates to your robots.txt file. If you’re a WordPress user, this is really easy and we’ll show you how to do this below.
- Set up Google Search Console for the property or domain you want to add to Google.
- Submit your sitemap via Google Search Console, and request Google to crawl your website.
How to add your WordPress website to Google Search
As mentioned above, in order to index your WordPress website you will need to enable the Googlebot to crawl your site, then create a sitemap, and finally, submit your sitemap via your Google Search console account. We have outlined the step by step process for this below.
Step 1 – How to ensure the Googlebot can crawl your site (robots.txt)
Enabling the Googlebot to crawl your website in WordPress is really easy to do. When you’re ready for your site to go live and be visible via search engines, follow the steps below:
- From your WordPress dashboard, hover over ‘settings’ and select ‘reading’
- Scroll down to the ‘Search Engine Visibility’ section, and uncheck the box next to ‘Discourage search engines from indexing this site’
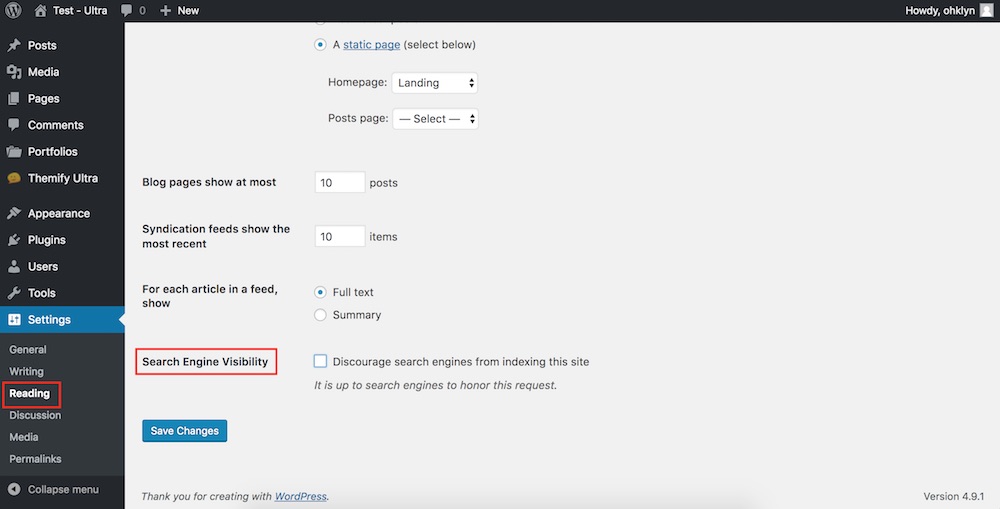
- Then, save the changes
And that’s all you need to do for the first step to allow Google to crawl your website. Let’s move on to the next step.
Step 2 – How to install and configure the Yoast SEO plugin
Yoast SEO is a free WordPress plugin that we recommend for all users. In this case, we’ll use it to create your sitemap. In addition to that, Yoast SEO is one of the best and most accessible SEO plugins available for WordPress and is regularly updated to stay in touch with the latest developments.
Here’s the steps to install the Yoast SEO plugin and create your sitemap:
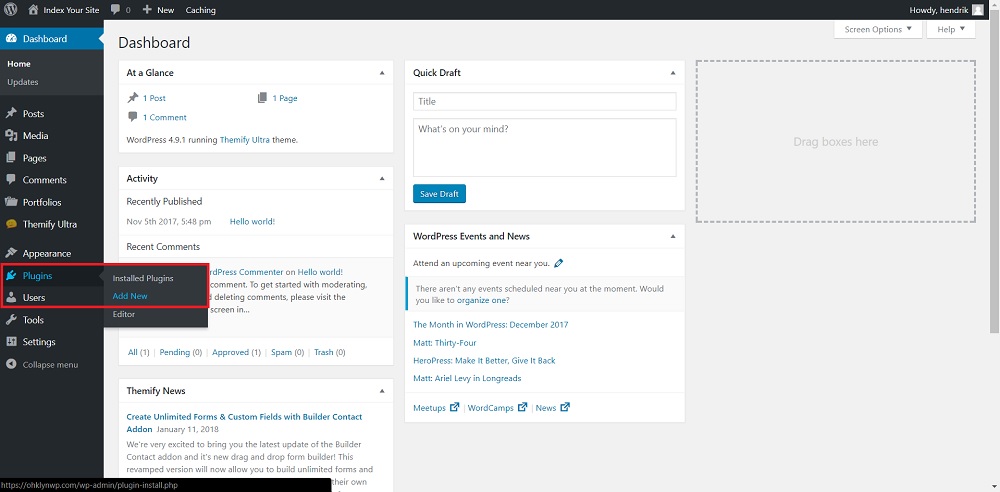
- From your WordPress Dashboard, hover over ‘Plugins’ and select ‘Add New’.

- You will be taken to the WordPress plugin repository. To find the Yoast SEO plugin, search for ‘Yoast SEO’ via the search bar. The Yoast SEO plugin will be among the top results.
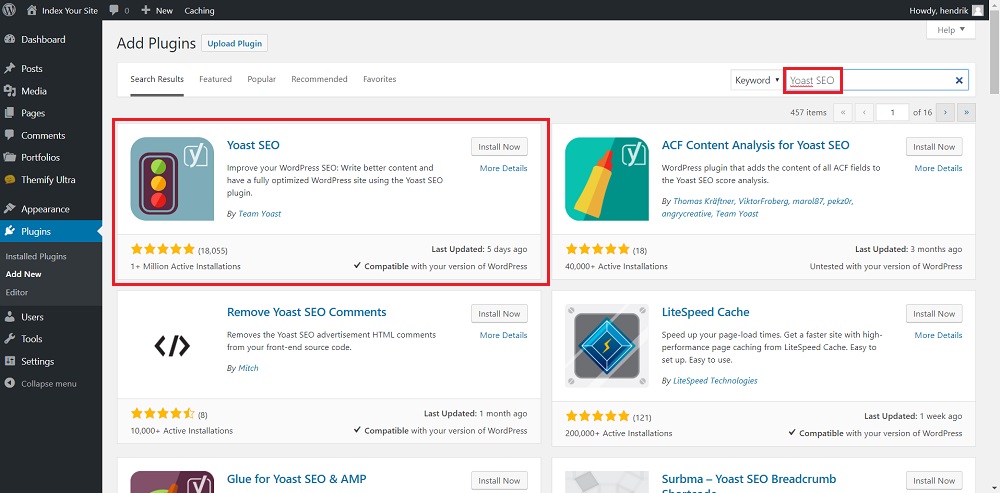

- When installing plugins it’s a good practice to review the star rating, the number of reviews, when the theme was last updated, and if it’s compatible with your version of WordPress. In this case, these all look good.
- Then click the ‘install’ button to install the plugin.
- When the plugin is installed, select ‘Activate’ to activate the plugin.
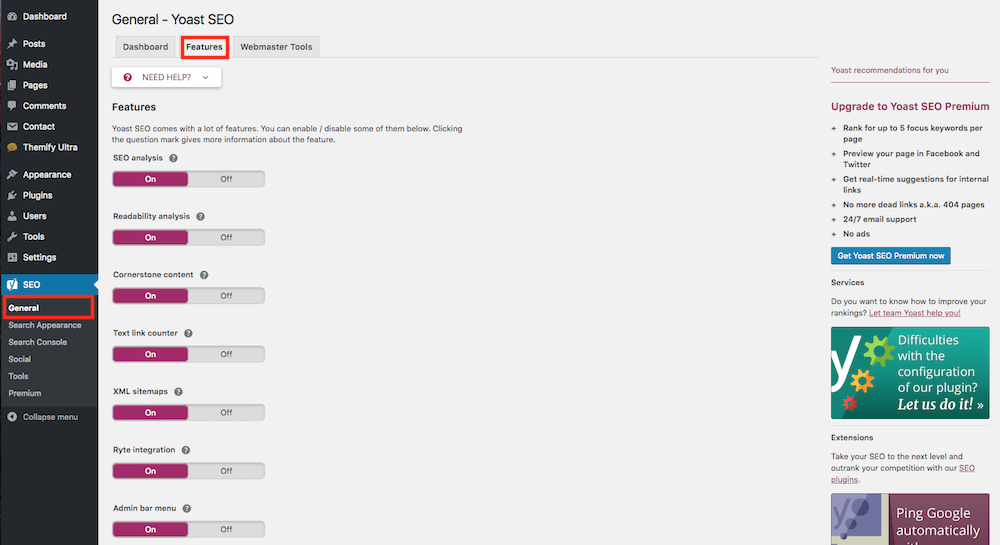
- Once the plugin is activated, you should see a new ‘SEO’ tab with the Yoast logo in admin menu on the left.
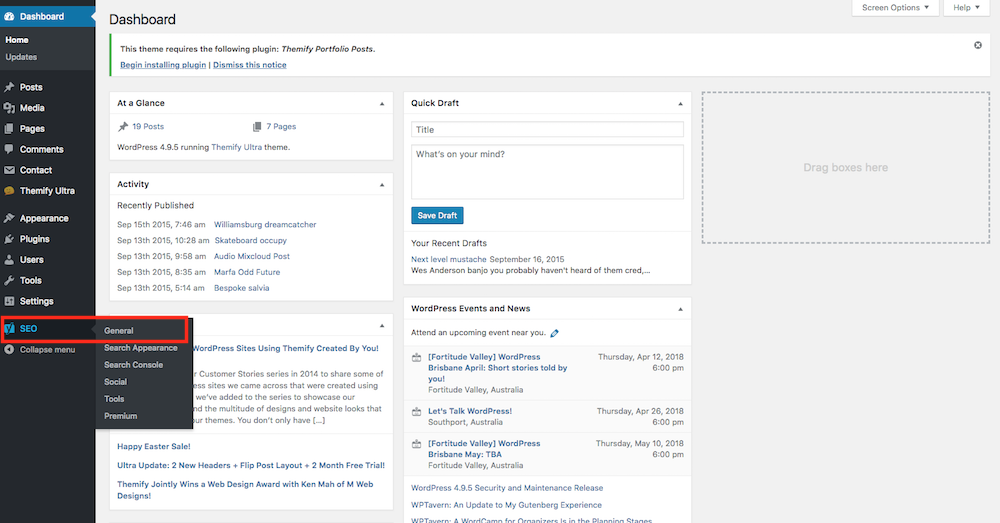
- Hover over the newly created SEO tab in the admin menu and select ‘General’.
- From there, navigate to the ‘Features’ tab, then scroll down and ensure that all the settings are switched on.

- Now, go back to the Yoast SEO options in the left-hand menu and select the ‘Search Appearance’ option.
- From there, navigate to the to the Content Types’ tab. Here is where you’ll select the contents of your site that you want to index. For most people, you will only want to index pages, and posts. To do this you would switch the ‘Show […] in search results’ option to no for everything that you DON’T want indexed. If you need more information on the various settings, click on the ‘Need help’ drop down, where you can access a video tutorial specific to the page you’re on, as well as access the knowledge base.
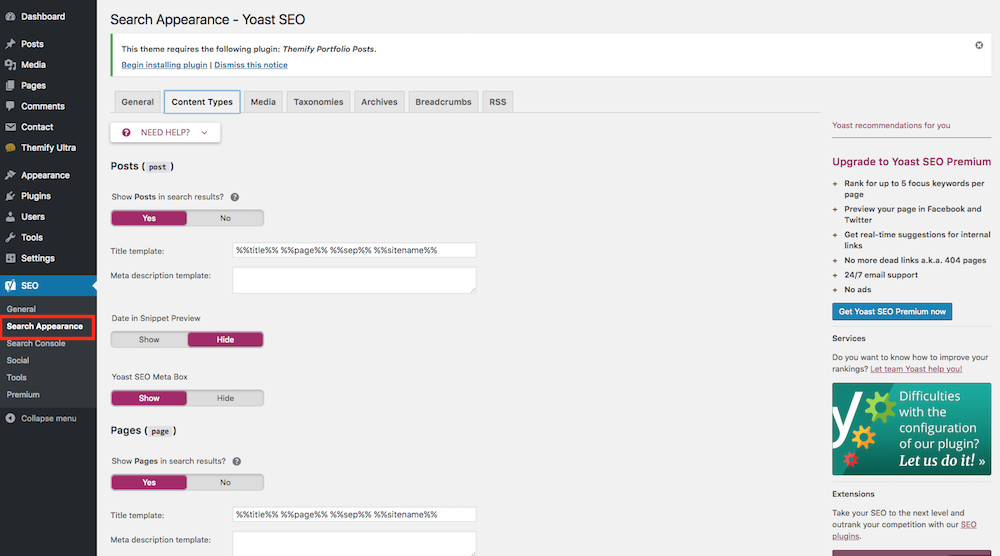
- Once you’ve gone through and excluded the content that you don’t want to index on the ‘Content Types’ tab, do the same thing for the ‘Taxonomies’, ‘Archives’, and ‘Media’ tabs.
- Then click on ‘Save changes’.
- Now that that’s done, go back to the ‘General’ option in the Yoast SEO menu.
- Go to the ‘Features’ tab, then scroll down to the XML sitemap entry.
- Click the little question mark icon next to the ‘XML sitemaps’ title, then click on the ‘See the XML sitemap’ link which will open a new browser tab with your sitemap.
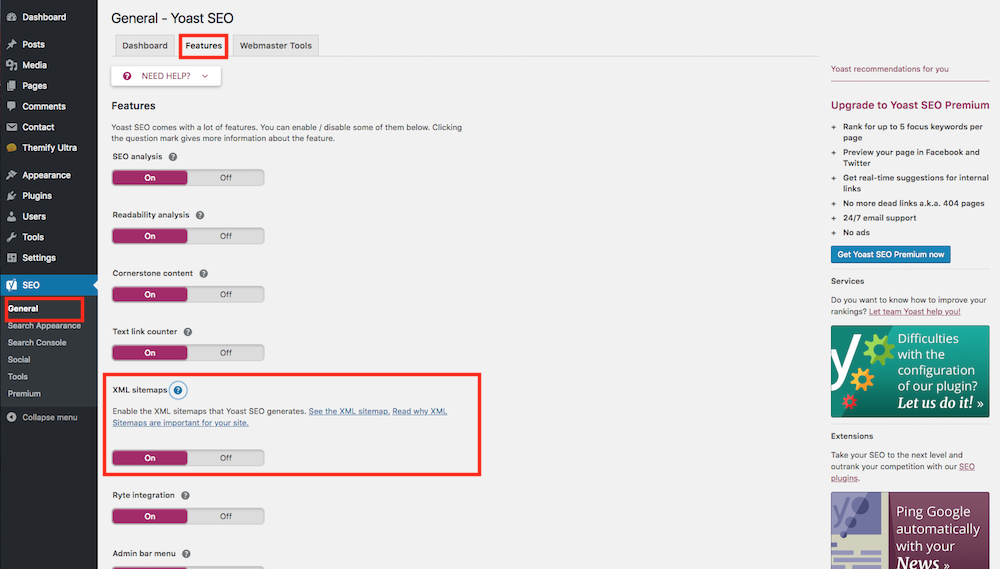
- Copy the link from your URL bar in the browser and copy it somewhere for later use in the Google Search Console.
That’s it for installing and configuring the Yoast SEO plugin, and creating your sitemap URL. We can now move on to setting up your free Google Search Console account and indexing your site.
Step 3 – How to use Google Search Console to index your site
Google Search Console is a free tool by Google and is what we’ll use to request Google to crawl your website or blog. This tool will also help you manage any crawl, 404, or other errors related to your site. Let’s go through the steps to set up your account:
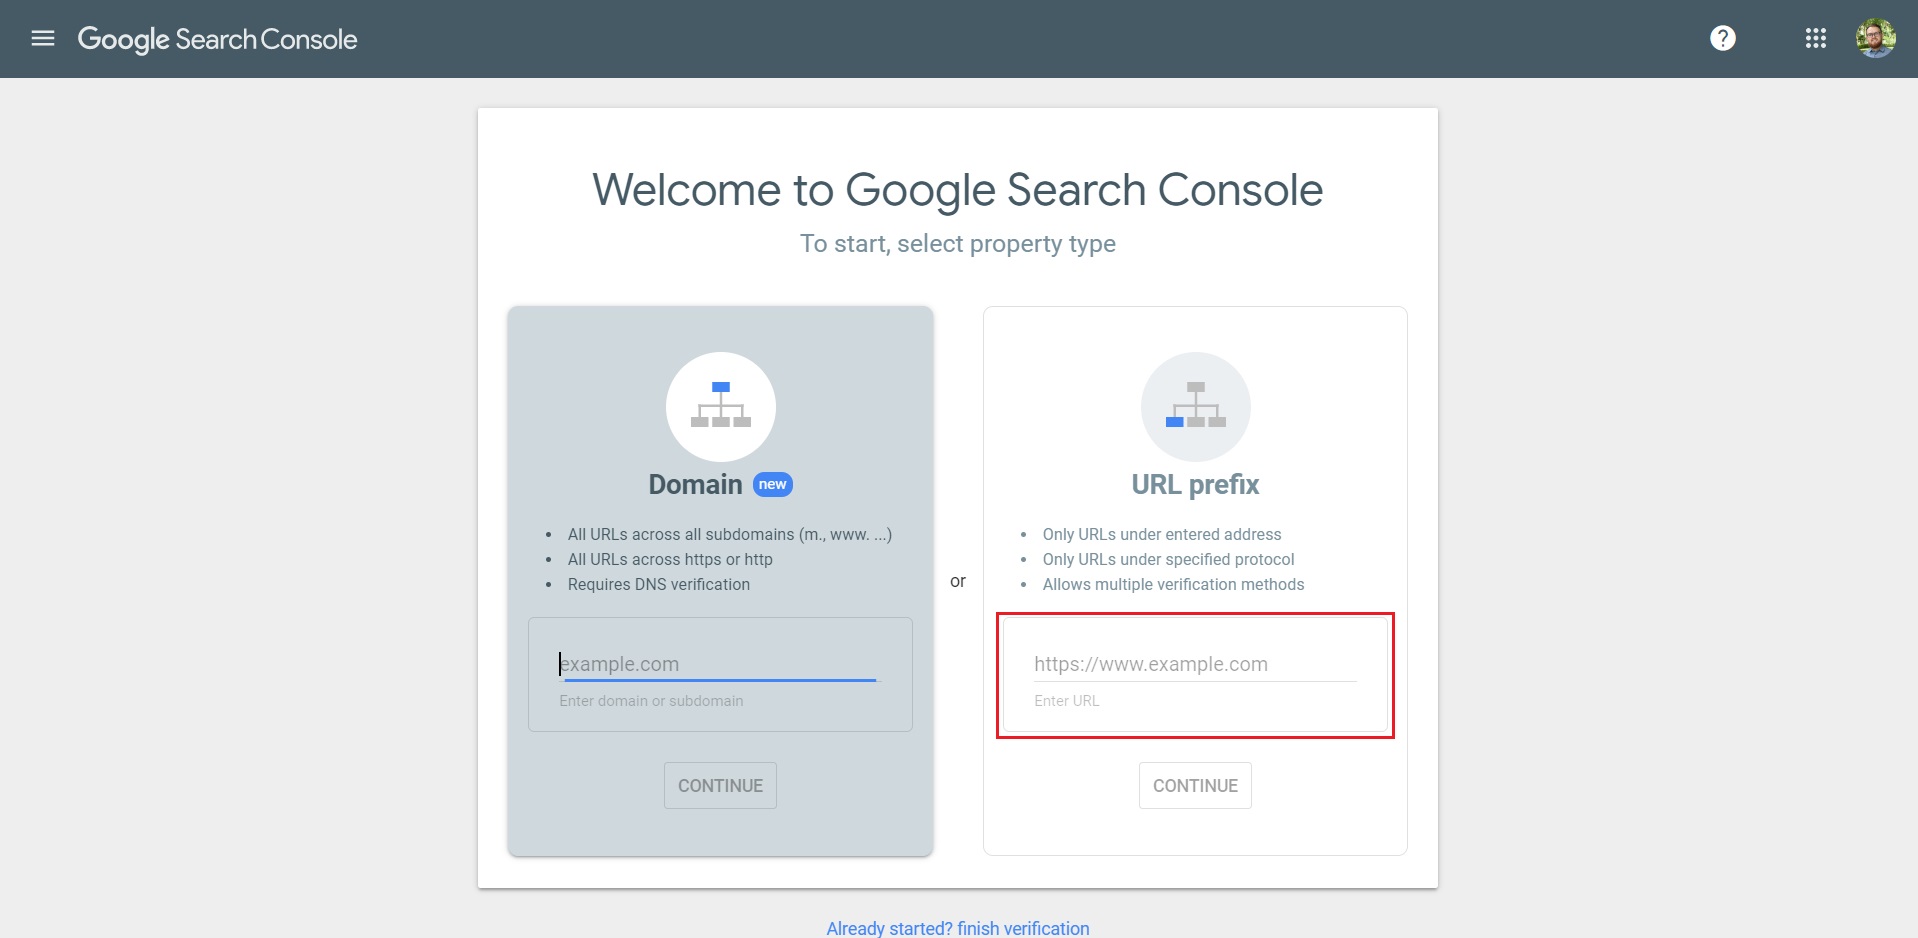
- Head over to the Google Webmasters Search Console. You will need to log in to your Google account first to access it. There shouldn’t be much going on if you haven’t worked with it before.
- Copy the link to your domain straight from the address bar and paste it into the ‘URL Prefix’ text field. Then click on the ‘CONTINUE’ button.

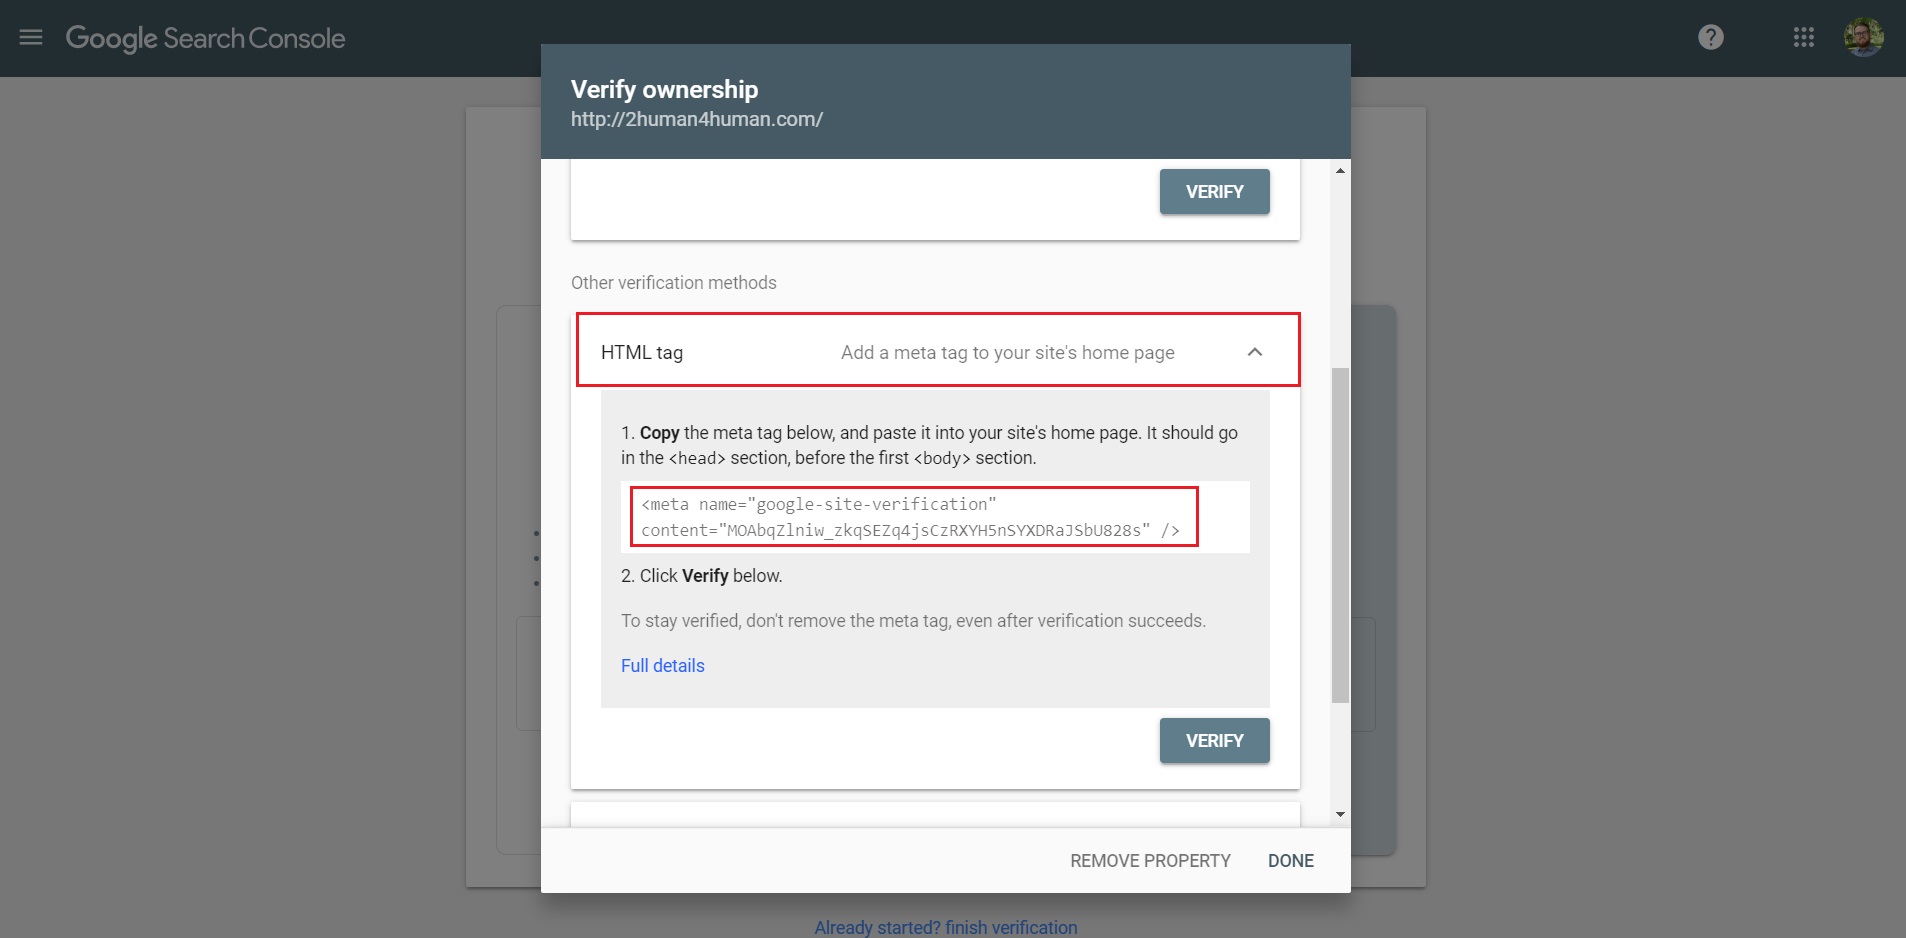
- You will then be asked to verify the ownership of the domain. Expand the ‘HTML Tag’ tab. A meta name tag will now appear on the screen. Select the whole tag and copy it.
- Go back to your WordPress admin dashboard, and under the Yoast SEO tab in the left-hand menu, select ‘General’
- From there, navigate to the ‘webmaster tools’ tab. Paste the meta name tag you copied from Google Search Console into the Google verification code text field. As a side note, you can index your WordPress site for other search engines using the same approach. Save your changes.
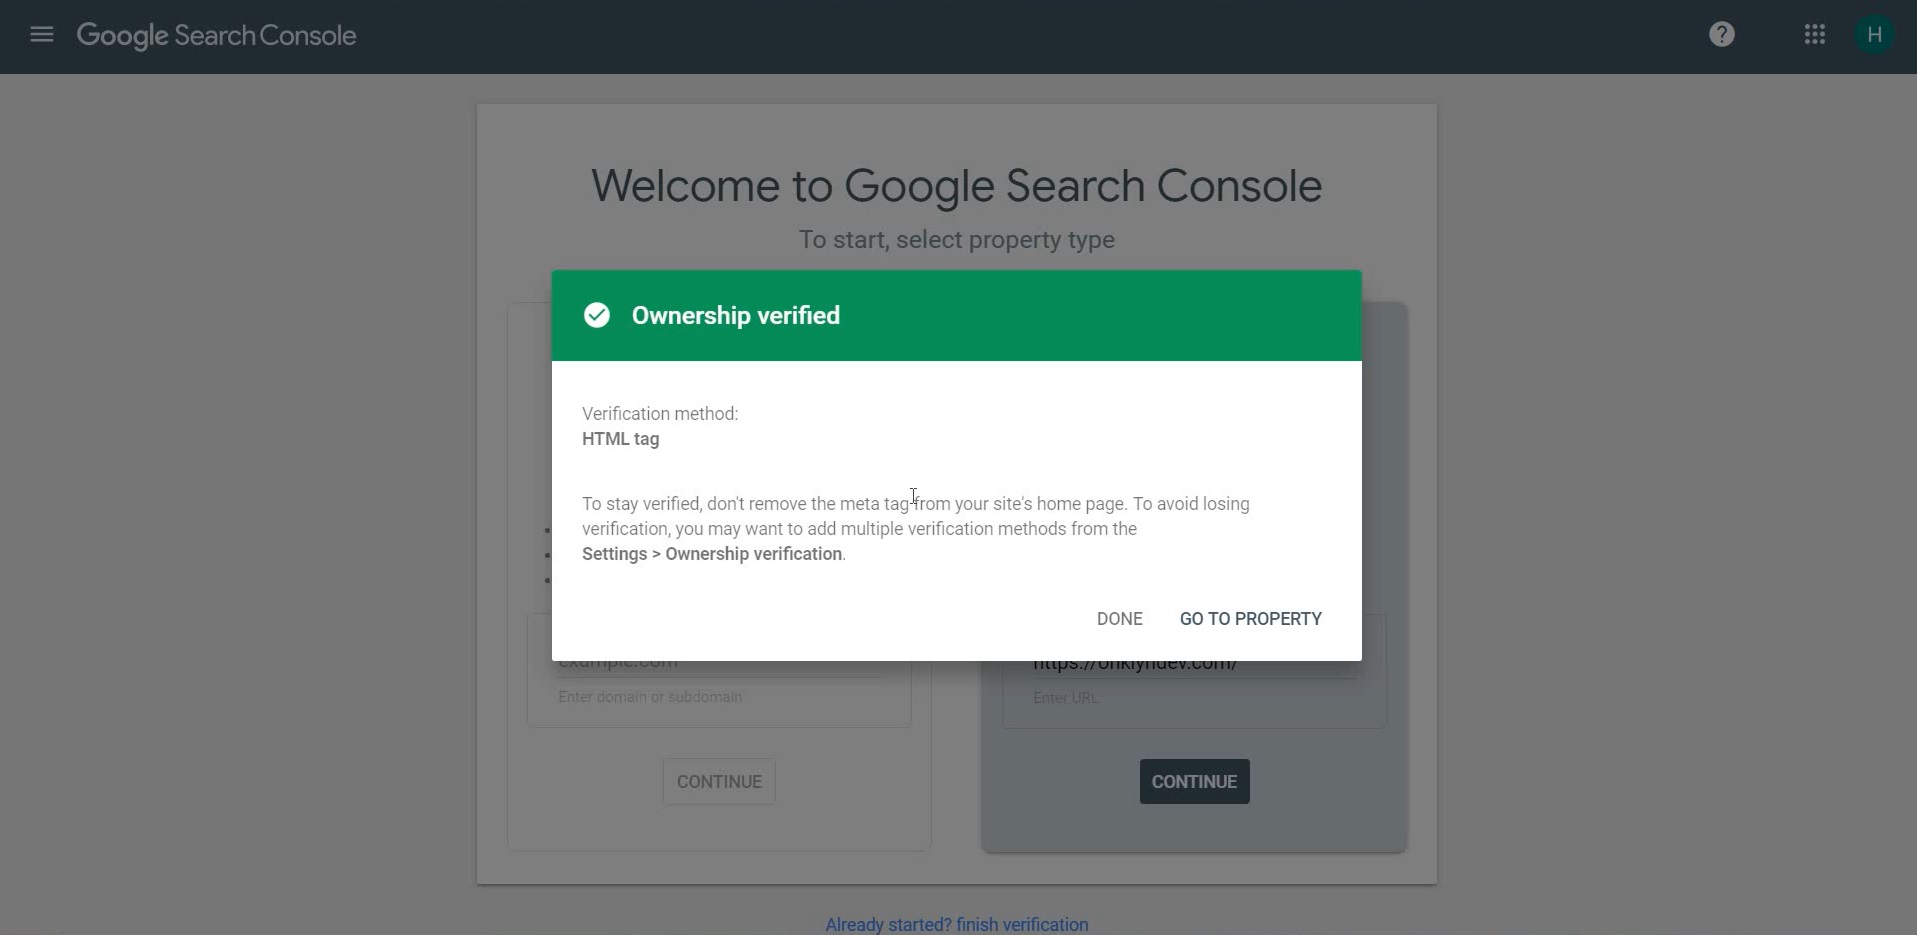
- Once this is done, you can head over back to your Google Search Console and hit the ‘Verify’ button. You should be greeted with a friendly congratulations message, showing that it found the tag and everything is good up to this point.
- Now, click on the ‘ADD/TEST SITEMAP’ button. Hopefully, you kept that sitemap URL you copied earlier handy. Paste everything after the forward slash at the end of your site URL into the pop-up box and click submit.
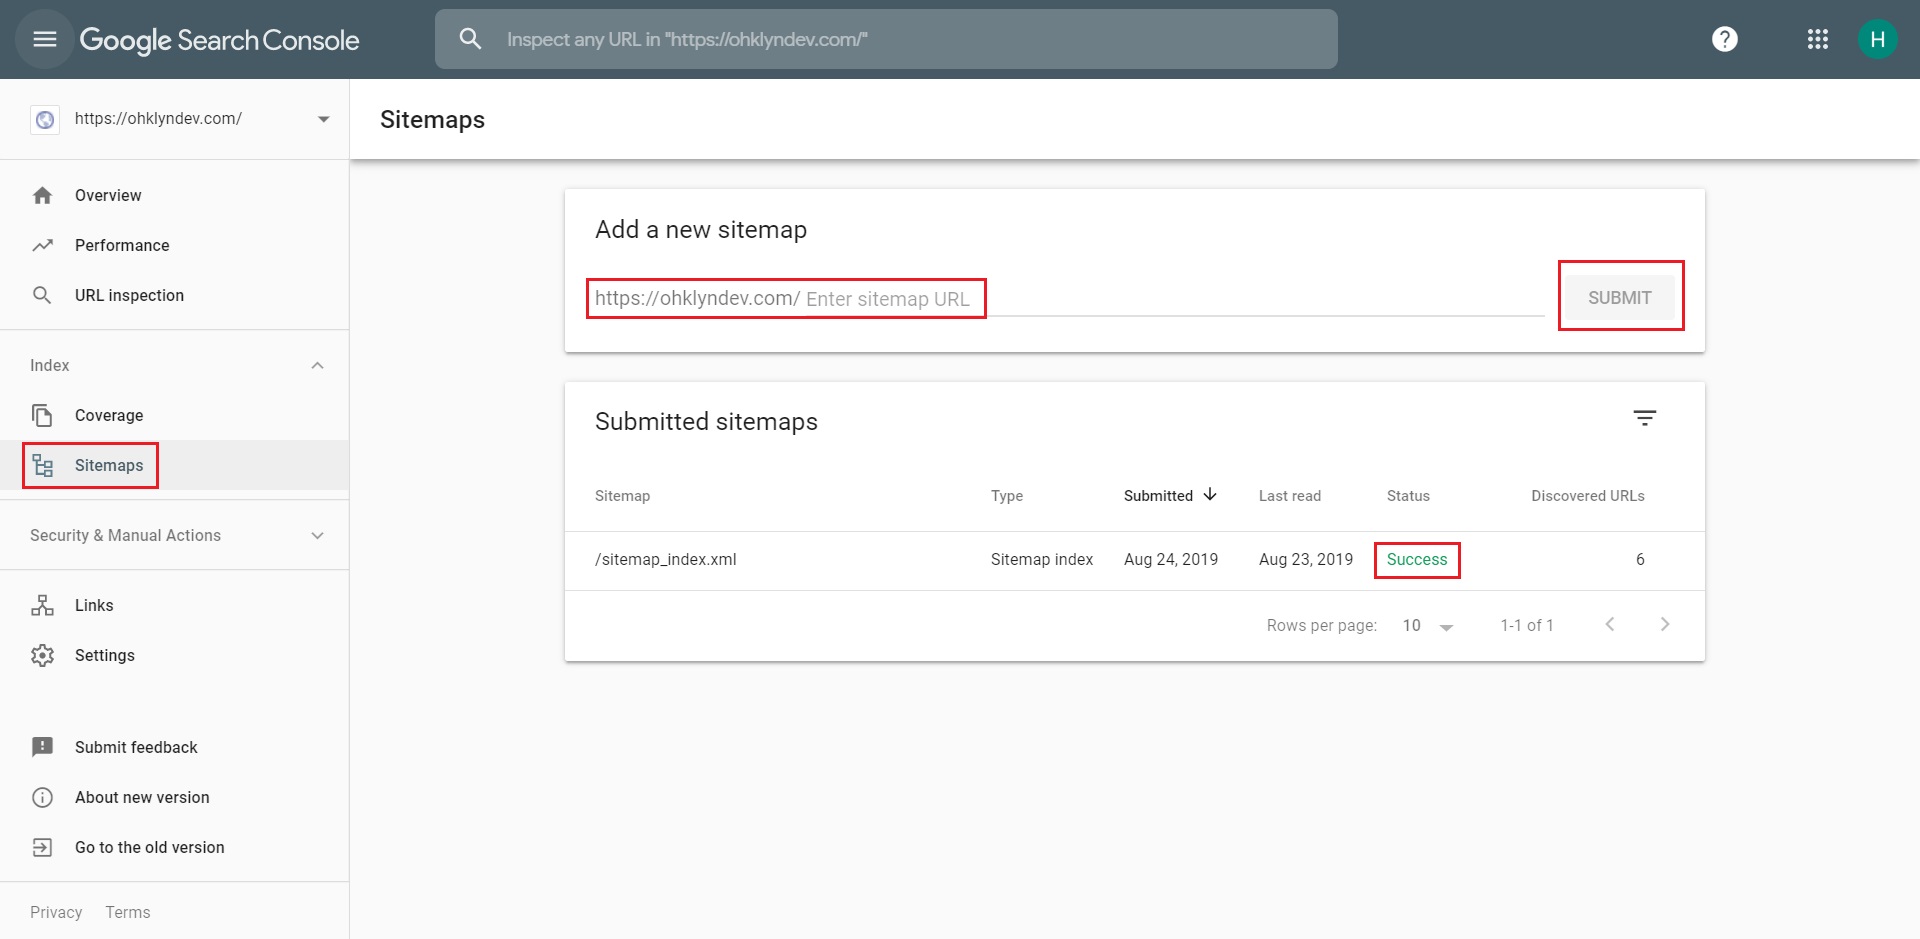
- You should be asked to reload the page and once you do there should be a new sitemap entry waiting for you. If you have an error it’s most likely because your site blocks bots from viewing it. Don’t worry about this.
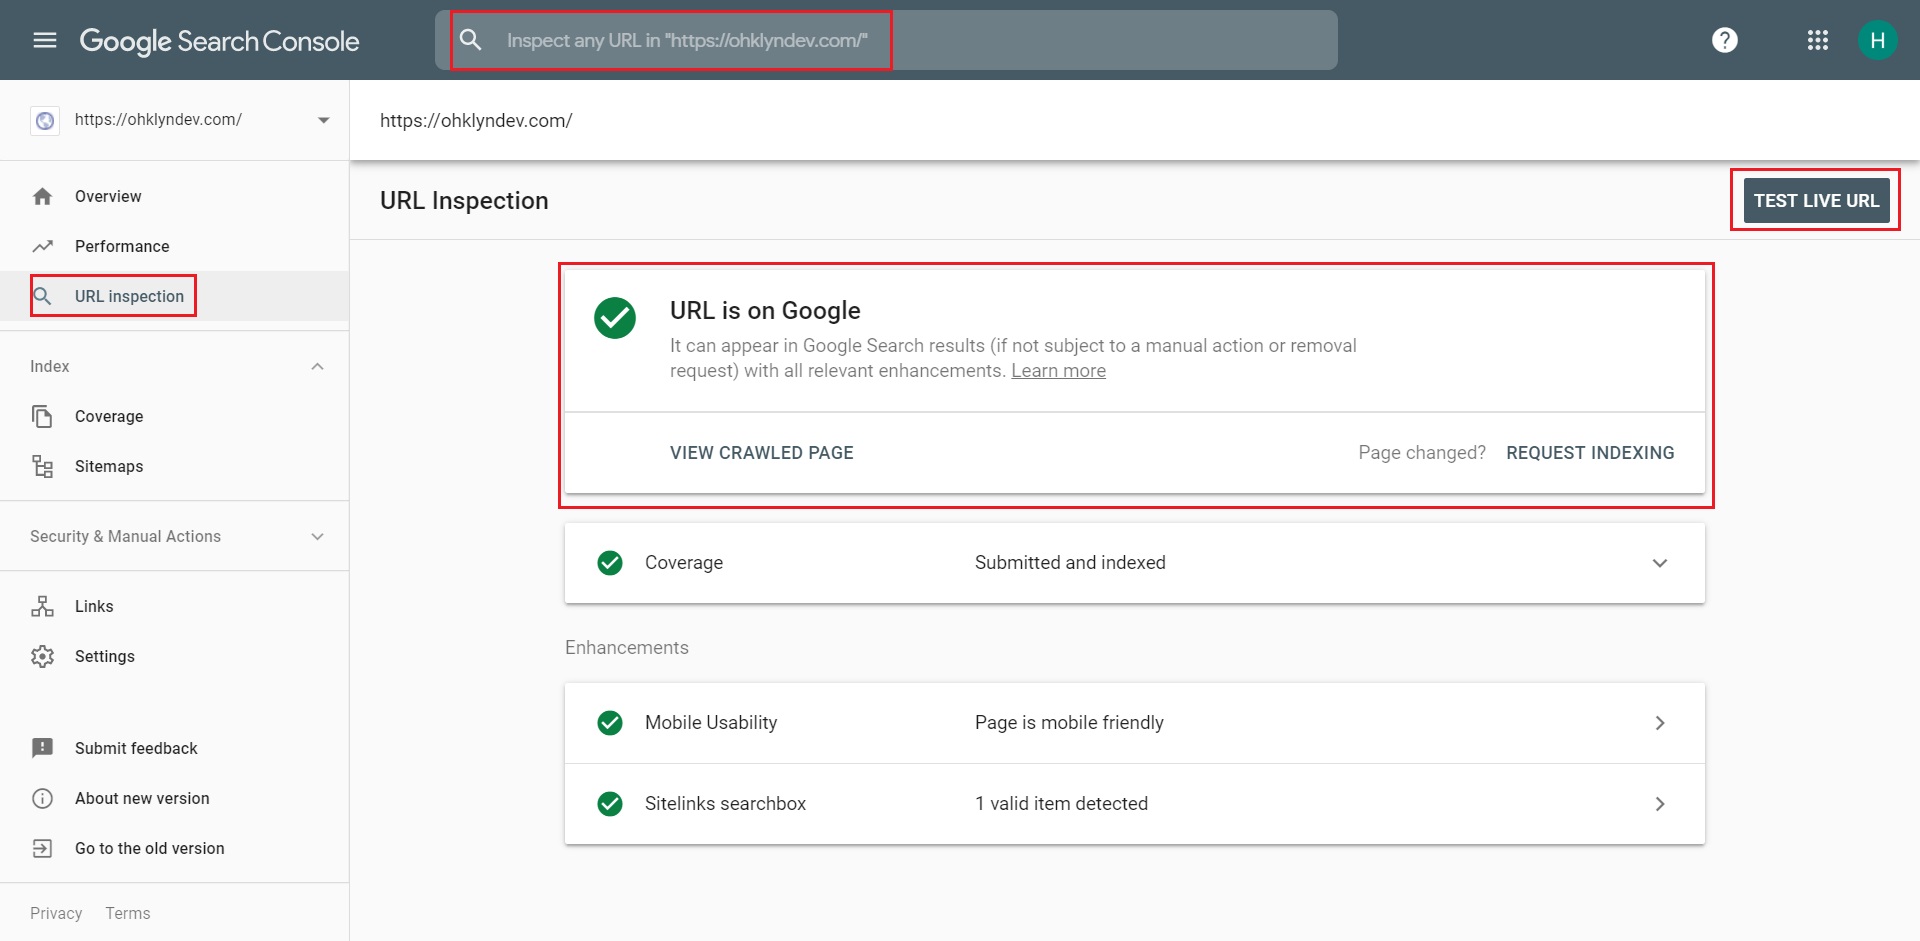
- In the menu on the left, under Overview, click on ‘URL Inspection’ or use the ‘URL Inspection’ field at the top of the screen. Select your website from the drop-down or copy and paste your domain URL and hit search. It might take a while to complete.
- Once it finishes you should be presented with a number of fields with successful statuses. The ‘URL is on Google’ field will show whether your website has been successfully submitted. Click the ‘Submit to index’ button next to it. Once you’ve done this, you can test your website again at any time by clicking the ‘TEST LIVE URL’ button in the top right.
There are two other ways in which you can add the meta tag to your WordPress site (step 5) in order for it to be picked up by the Google Search Console for slightly more advanced users:
- You can copy it directly into the markup of the header.php file of the theme you are currently using or,
- You can inject it into the theme header code through the theme injection tools. Two themes that have this functionality are Divi and Ultra.
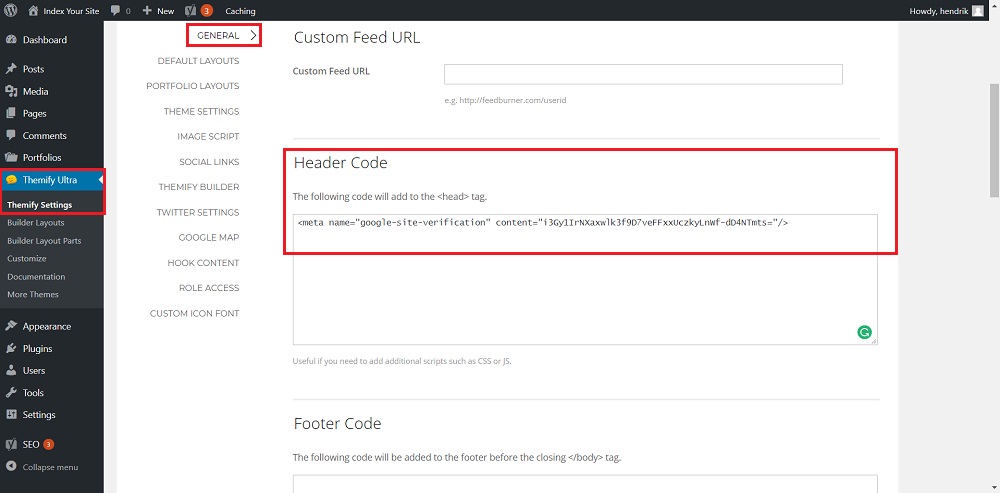
You should take care to not change or remove any script or markup you aren’t supposed to as well as to only add the meta tag and nothing more as otherwise it could negatively affect your site.
That’s it! You have successfully submitted your site to be indexed by Google. You are one step closer to improving traffic to your site using Google Search Console and the Yoast SEO plugin.